Guide to Unstoppable
Page Contents
Ultra Mutant is the rarest achievement as it requires a lot of time to get all the unlocks. Unstoppable is the second rarest, but may be more difficult overall for anyone going in blindly. Following this strategy guide will give advice on how to handle the worst parts of the game.
The specifics of this achievement is actually really simple. Start a run as Melting and reach the Labs area, taking a lethal amount of damage while in a Necromancer's revive circle. This will transform Melting into Skeleton, who cannot be unlocked. He is then reset to level 1 and upon reaching level ultra will receive the achievement, which takes a total of 2,701 rads.
The reason on why Unstoppable is so difficult to obtain is because Skeleton is the most challenging character in the game. He has 4 max HP (slightly better than Melting), poor accuracy (slightly better than Steroids), and slow walking speed. While the weapons/crown Melting was using carries over to Skeleton, starting from level 1 may make for a lot of failed attempts. Palace, both Throne fights and loop Desert can be very unforgiving.
Update 100 makes multiple changes to the game from previous versions.
A bug around Hammerhead was patched that was used on update 99 where Skeleton would
retain unused tiles from Melting after transforming without the mutation.
For update 100, blood gamble was changed to
no longer consume rads when blood gambling ultra weapons. This enables Skeleton to
run ultra weapons while going for ultra, without having to sacrifice sooner level ups.
The best ultra weapon to run in this situation is Ultra Crossbow as Skeleton only has a small chance of taking damage from it (~14% chance), and it can be repeatedly gambled by him to dig into walls. Ultra Grenade Launcher is another strong option if it turns up.
If not wanting to rely on rng for certain weapons to drop then the proto chest can be utilized from another run, storing a strong weapon there for Melting to pick up in the 5-2 Vault in the main run. Y.V. and Cuz can utilize Y.V.'s Crib to quickly find weapons to store, especially with Open Mind. (Alternatively, Fish always gets a guaranteed Guitar when starting loop which is very strong for ammoless melee)
Setup Phase (Melting)
Skeleton starts at level 1 with 0 mutations and only keeps his held weapons/crowns. So while Melting's main goal is just to get to Labs alive, some important setup can be done to help Skeleton be more successful.
The first manner of business is weapons. Melting should take weapons that not only helps him get to Labs, but that Skeleton can use to survive through Palace and Throne fights with. Due to Skeleton's difficulty getting pickups early on he will struggle with any weapons that are particularly high on ammo consumption such as bullet weapons, and blood gambling them may not be very helpful. His inaccuracy will make weapons with wide spreads not useful either, such as any pellet (shotgun) weapons, or some bolt weapons. Melee weapons can help offset ammo problems, but most will be unhelpful against Elite IDPD in loop who behave very aggressively.
Weapons that would be especially good for Skeleton here includes Plasma Cannon, Gatling Slugger or Hyper Launcher as all deal solid damage and are also decent trade-offs for blood gambles. Explosive weapons in general are really useful, just be careful in Palace for teleporting Guardians. Helpful melee at this point would be Jackhammer to focus mainly on defense, and Energy Sword is a high-tier weapon so long as it has some mutations to compliment it.
As mutations are reset, Melting can take anything that helps him get to Labs easier or help increases Skeleton's chances of survival.
-
Melting can take these to make Labs easier for Skeleton:
- Open Mind: Especially helpful in update 100 as it gives two extra chests, this can easily be the difference of an extra level if it gives extra rad canisters, otherwise getting an extra ammo boost.
- Melting can skip a single rad canister on 5-3 to give Skeleton an overflowing one in Labs (or even multiple ones). Skipping two for Hostile Horror is a very bad idea.
- Scarier Face: If Skeleton is able to transform early then he could use the boost in killing Rhino Freaks quicker.
- Hammerhead: While mainly useful for an update 99 run, if taken on update 100 then Melting can dig out multiple walls before transforming to give Skeleton a safe place to fall back to.
-
Mutations Melting should avoid taking:
- Impact Wrists and Sharp Teeth can accidentally kill Necromancers and should be avoided.
- Depending on the method of transformation, either Gamma Guts or Boiling Veins should be avoided. Gamma Guts can also kill Necromancers on accident.
- Melting's Throne Butt and Bolt Marrow are fine to take in a run, just limit their usage in Labs.
The sets that Skeleton see will be the same sets that Melting saw, in most cases. This means that the player can plan out what mutations Skeleton will see, one particularly helpful option would be to try the Daily scouting sheet as mutations are already pathed out by scouts. If this sheet is confusing there is a guide for it, but there are also some particularly advanced mechanics. If there is a Melting weekly this would be the best option to grind out Skeleton runs as it can be replayed any number of times, unless if the starting crown is undesirable.
The only other thing to consider is that crowns are transferred over to Skeleton, however most of them are particularly unhelpful due to his frail start. The only decent option would be Crown of Curses as it can help Melting/Skeleton see better weapons sooner, and weapons can be uncursed by entering the 7-3 portal and in the Desert Vault which are both nearby Labs.
Transformation Strategies
When going for Unstoppable the best option is to transform in preloop Labs. The other option is Frozen City in loop, but this is not a safer alternative. Necromancers are not fully guaranteed to spawn in Labs, so some attempts may be unsuccessful by virtue of bad RNG.
Melting must take a lethal amount of damage within a Necromancer circle in order to become Skeleton. Strong Spirit will block lethal damage so it must be dropped before turning. Necromancers will attempt to revive the corpse of any enemy or prop that is within their line of sight. It is not a frame perfect trick, so long as the circle is active as Melting dies he will be transformed.
Self-damage method:
Easy ways to self-damage include explosive, toxic and blood weapons.
Some of these weapons may be difficult to time properly and are not
ideal, and Skeleton may likely have to use that weapon throughout
Palace. The best weapons at this point would be Grenade Rifle or Hyper
Launcher, as both are great choices to handle the Palace/Throne fights.
Once a revive circle appears next to any wall, Melting can rush over and
shoot his explosive at the wall and will transform with ease. Blood
Hammer is also a decent pick but is risky to fight either Throne fight
with.
Enemy method:
The Freak method is recommended as setup can be relatively risk-free
once understood. Freaks have two modes, the first being an 'idle' mode
where they will not move from their position. They enter 'active' mode
permanently once line of sight is made with the player at least once,
they will forever walk around the level bumping into walls and the
player. Revived Freaks will start in idle mode, which the player can
utilize for safe transformations:
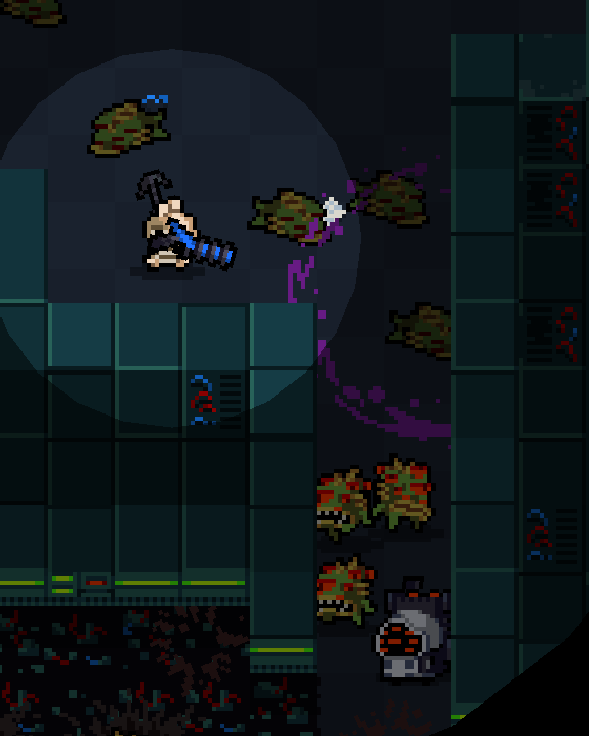
Following this image a bunch of Freaks are killed in a hallway by a corner. The ones that are revived are in idle mode, so they will be stationary so long as Melting does not enter their line of sight.
Once the Necromancer initiates a revive circle to the ones above, Melting can dash around the corner downwards towards the other Freaks. They are close enough that they will kill Melting before the timer runs out, although he must be quick. This is a reliable method to transform with minimal risk towards the player, rather than try to walk around in an open area. Make sure that Melting is at 3 HP or below without Strong Spirit active while doing this.
This could be attempted with Rhino Freaks and Explo Freaks as well, but since they always walk towards the player it's a shorter viable window. While these enemies can provide extra rads for Skeleton, sometimes they just have to be killed by Melting to ensure a runs success as keeping either alive in close proximity is dangerous.
Necromancers only have 6 HP and are very fragile. Randomly shooting down hallways or approaching corners where they are clustered with Explo Freaks can cause them to die, and could potentially waste that attempt. The best way to take Labs is to clear it slowly and react where necessary. Melting's active should only be used sparingly to avoid accidentally killing Necromancers, only ever being used if there are excess corpses that get in the way of safely transforming.
As Necromancers cannot damage Melting directly if they get stuck in a corner with no enemies around, Melting can simply walk behind them and push them towards an area with enemy corpses, provided that he does not have Gamma Guts.
Skeleton Skillset
Skeleton's only upside is blood gambling, as he is the only character in the game without a beneficial passive. It is useful to read through the abilities section for Skeleton's character page to be familiar with how his active works. A basic summary is that the more ammo a weapon shot uses the more likely it causes self-damage, in relation to how much that ammo type's pickup is worth.
A vital mutation to take for Skeleton would be Bloodlust as he can blood gamble far more frequently which saves on ammo. Any mutation that is generally good holds true for Skeleton as well, although particularly useful ones would be Bolt Marrow, Long Arms, Laser Brain and Trigger Fingers which are all dependent on weapons/build. Euphoria and Hammerhead are decent safety mutations due to Skeleton's difficulty, while Throne Butt is great to let Skeleton gamble far more often with any high ammo weapons (such as Super Flak Cannon). In update 100, Open Mind is even a decent pick here as two extra chests lets Skeleton collect safer rads/ammo much more frequently.
Skeleton's multiple negative passives will limit him in different
ways:
Less max HP means many things can kill Skeleton in one
hit, so Rhino Skin and Strong Spirit will be important mutations for the
run.
Slower speed will make Skeleton have a really difficult
time collecting rads/pickups out in the open as dodging/fleeing is
always going to be difficult for him. Extra Feet is a good choice,
although not required by any means. (Plutonium Hunger can also help a
lot for pickups, so at least consider this one.)
Less accuracy makes some weapons less viable, but
usually won't ruin Skeleton's run. Eagle Eyes can be considered low
priority as inaccuracy is the least limiting of these three.
With Skeleton's skillset in mind he should focus on finding a weapon that has much higher ammo cost giving more benefit to blood gamble, or on update 100 finding good ultra weapons in loop, provided he has mutations to compliment gambling (Rhino Skin/Bloodlust). This can be key to helping deal with less ammo and more aggressive enemies, as Skeleton will often be stuck near spawn for many levels. Anything that can either deal a high amount of damage or has decent range will be important in helping Skeleton survive.
Post-Labs Gameplay
The Palace
This is easily one of the most dangerous areas to start out with. Depending on how Labs went, Skeleton may still just be level 1 without any mutations, and will also likely not be at full health. This fragile start will be faced with a good chance of IDPD all around spawn, with very aggressive enemies closing in shortly after.
Palace areas are usually open spaces and enemies have a tendency to walk towards the player, so leaving spawn is usually a dangerous idea. Common enemies in this area includes:
| Icon: |
|

|

|

|

|

|
| Contact: | 6 dmg | 2 dmg | 2 dmg | ~ | ~ | ~ |
| Projectile: | 5 dmg | 2 dmg | ~ | 3 dmg | 5 dmg | 3 dmg |
| Priority: | Low | Medium | High | Medium | High | Medium |
| Notes: | Frequently will teleport if in line of sight. Not a big threat so long as there is cover. | Easily causes chip damage and can be an annoyance if hiding behind Dogs. | Highly aggressive nature towards the player. | Usually easy to take out, only an issue if swarmed at spawn. | Telekinesis and a one shot projectile is a death sentence for Skeleton's slow speed. | Can shoot from off-screen and deflecting is annoying, making leaving spawn more difficult. |
"Priority" is a general assessment on what will give Skeleton the toughest time around spawn. Dog Guardians and Inspectors can both kill Skeleton in one hit and have aggressive attacks, so they should be dealt with as soon as possible. Enemy iframes will not apply when Dog Guardians jump, meaning that any weapon that usually respects iframes (mainly melee weapons) can deal major damage. This still comes at a risk as Skeleton will have to quickly react to their jumps, the best way to handle this is standing in line of sight next to a corner and then swinging melee while backing up as soon as they pounce.
Explo Guardians and Normal Guardians are not high priority as long as Skeleton has any sort of cover, he can wait until they are close enough to kill and collect their rads reliably. Be aware that killing any Guardian enemy can break walls (as well as Dogs pouncing), so Skeleton can very easily have his spawn exposed. The same applies for any IDPD grenades, another benefit to running a melee.
If utilizing the Hammerhead bug on update 99 or using Ultra Crossbow from proto chest on update 100, these will be the most useful on Palace spawns to make space. Dog Guardians cannot jump through one tile gaps and protects Skeleton from really bad spawns, and making an L-shape hole in the wall is suggested to avoid any perfectly aligned projectiles.
Leveling in these early areas will depend heavily on how spawn looks. If Skeleton needs to hide in walls/spawn the entire level he may barely level at all, while a spaced out Palace will have him level far easier. Taking it slow and methodical is important to maximize safety as Skeleton is fragile, but also needs to be balanced with pushing out when necessary to have some mutations by the time the Throne fights are reached.
The Throne
The Nuclear Throne will be an intimidating roadblock as its laser and orbs attacks can kill 4 HP Skeleton in one hit. The normal projectile bullets only deal 2 damage, although getting hit twice in quick succession is also common. Melee is often strongly preferred here as if the Throne cycles its orbs attack multiple times in a row, it may completely overwhelm Skeleton in a situation he may not get out of otherwise.
The best way to handle the Throne is the general strategy, which is to stand on the red carpet sides constantly. This will allow the Throne to cycle its laser attack which has a very loud audio cue and is easy to dodge, and gives Skeleton some breathing room to fire at Generators/the Throne without having to worry about any other projectiles.
Generators will drop rads/pickups but being on the sides of the Throne may cause it to spam its orb attack, so the safest time to do this is to rush over the moment it starts to charge up its laser beam. If not running Plutonium Hunger or Extra Feet yet this will still be a risky option. If any Guardians awake they should be handled swiftly to avoid having to keep track of any extra projectiles.
This fight is mostly just about good reaction time, so long as the Throne's beam attack is continually baited out Skeleton should be able to overcome this boss. When completing the fight whatever weapon is in the 7-3 chest should be brought with 0-1 through the loop portal, if it's cursed it can quickly be picked up before leaving the level to uncurse it right away. This can be used on both IDPD on 0-1, the Throne II fight, and the 1-1 L1 spawn depending on what the situation calls for.
Throne II
Entering 0-1 L1 will have multiple IDPD spawn right away. Skeleton should immediately locate the best corner while firing at the nearest IDPD portals as they spawn in. Any sort of cover will be vital here due to his low HP, multiple Shielders and Inspectors can easily end a run.
Throne II will be another skill check for Skeleton. The sooner the fight is ended, the better, as Skeleton's slow movement may make him really struggle. His biggest threat here will be the laser attacks, which are continuous bullet streams that do 2 damage each and can quickly overwhelm. Avoiding close range is important here as Throne's 'star' attack where it shoots out orbs in every direction is pretty unpredictable and very hard to dodge at such a slow speed.
It's best to slowly circle around the arena following Throne II around while chipping away at its health, all the while staying on high alert for whatever attack it cycles through next. Skeleton can also use the weapon from the 7-3 chest and exhaust all of its ammo on Throne II, switching back to his main weapon afterwards. Swapping weapons will also reset cooldown so he can 'hotswap' if running any high reload weapons, although standing in one spot for too long can be dangerous.
The IDPD
The entire time Skeleton is in loop he will constantly have to deal with Elite IDPD. They are an oppressive force normally and is far worse for Skeleton to have to deal with due to their highly aggressive nature.
Elite IDPD will punish different kinds of playstyle, so Skeleton will need to react differently based on which ones spawn. Listen to audio cues as they will sound different for normal/elites spawning, and always be ready to fire at the nearest IDPD portal.
- Elite Grunts will fire missiles if Skeleton is out of line of sight, and if out in the open they can damage very quickly. It's very important to take out them out quickly, one option is to hide behind a wall out of range of the explosion, as after firing a missile the Elite Grunt will remain stationary for a moment.
- Elite Inspectors can easily pull Skeleton in with their telekinesis due to his slow speed, so running away is not an option. They should also be considered top priority to deal with.
- Elite Shielders can teleport to spots that Skeleton is using for safety and can quickly overwhelm him. They can easily go from low priority to high priority, so be prepared to deal with them at a moments notice so long as they are alive.
Vans are usually easy to dodge even as Skeleton, just pay attention for audio cues. They will only spawn after any IDPD have been killed already, the best ways to handle these is to either destroy Vans before they spawn any additional IDPD (if a weapon has a high enough damage), or by firing directly at the back of the Van the moment that IDPD would spawn.
Be aware that if a Van is stationary it can provide easy cover for IDPD, who can fire through it freely while Skeleton is blocked by it. Pushing them as quickly as possible may not be an option here, so destroying the Van first may often be necessary.
The Desert
Palace can be a brutal start, and Desert can easily be a continuation of that. Flies can be an ammo sink due to their Maggot spawns and not dropping any ammo/health, and will always have to be dealt with first. An open spawn can be an immediate problem as Skeleton will have an impossible time pushing out at all. Running only single target weapons will have Skeleton be overwhelmed in spawn, while only short range weapons will have Scorpion clusters bully him from the corner of a level.
Blood gambles should be leaned into especially if running Bloodlust, as any time Bloodlust procs that's one more free shot for Skeleton. If running Rhino Skin then Skeleton can blood gamble down to 6 HP at any time safely, as no enemy does 6 or 7 damage between Desert and Caves, with Dog Guardians only returning by loop Frozen City. Going to low health by blood gambling is only suggested if running a healing mutation.
Upon reaching the first loop Vault Skeleton can choose between any of the 6 crowns, for the sake of this achievement Blood can be ignored. This is entirely up to preference/build.
- Crown of Death makes any explosive weapon much better, although always comes at a greater risk.
- Crown of Hatred can help reach Unstoppable faster passively, as 1 HP is traded for 16 rads every time a chest is opened.
- Crown of Love can help lean entirely into Skeleton's current weapons, and if his current weapons are great then this is the safest pick.
- Crown of Luck should run Bloodlust and Strong Spirit bare minimum, and is a very bold option.
- Crown of Protection means no extra ammo from weapon drops, but that extra HP can instead be used to blood gamble.
Following loop Vault, Skeleton will have to face off with two Big Bandits. They should be manageable for Skeleton as long as he doesn't get cornered in their line of fire. Similar to Dog Guardians, weapons respecting enemy iframes will no longer during their charge attacks, meaning melee swings can be done during that moment for massive damage.
Post-Desert
For the Sewers, be wary of toxic clouds and toxic Ballguys as they can overwhelm Skeleton. Mom's tanky HP will be one of the last big roadblocks, and her toxic blast will make having cover difficult the longer the fight goes on. If she's near spawn she should be treated as high priority before the IDPD spawns in, while a larger Sewers layout gives Skeleton a lot more space to back up to.
If Skeleton has collected enough rads at this point he should have enough mutations to decently defend himself. The biggest threats from here on will still be Elite IDPD, and always be on alert for Buff Gators who can erase HP. Assassins can be an issue too if they ever slip through, as Skeleton will never be able to dodge in time. Scrapyards is otherwise an easy area and collecting as many rads as possible should be focused on.
If Crystal Caves is heavy on cobwebs this will be really rough for Skeleton as he will be moving through at a snails pace. Laser Crystals can melt through health very quickly, especially if standing on a cobweb, but luckily this area can be taken as slowly as the player sees fit.
At this point Skeleton should hopefully be at higher levels as ultra slowly closes in. He can choose to either farm rads from Hyper Crystal by continually killing Laser Crystals spawned by it until ultra is reached, or continue on to the Frozen City. The game will be very difficult again with Dog Guardians returning on 5-1, Gold Snowtanks returning on 5-2 and Lil Hunter returning on 5-3, each adding another layer that Skeleton will have to deal with.
Skeleton should be able to reach ultra by the Frozen City, though this will be heavily dependent on how many rads he's been able to collect. This is why Plutonium Hunger can make a pretty big difference, making up for his slower speed. Once ultra is reached the achievement should be unlocked and the run can be ended.
There are two choices of ultras, Redemption returning Skeleton to his Melting state, or Damnation to lean entirely into blood gamble. If wishing to continue a run there is more information about his ultra tech and strategy guides on his character page.