Pickups Overview
Page Contents
This page will serve as an overview for pickups, which serve to help the player progress through the game. These are split up into four major categories; weapons to clear levels with, ammo to fuel those weapons, radiation (rads for short) to level up the player, and health pickups to recover lost HP.
Levels will typically include a weapon chest, an ammo chest and a radiation canister. However, generation may sometimes bug out and fail to spawn certain chests.
7-3 will not include a radiation canister normally, while 0-1 will not have any chests at all. Secret areas have their own variants listed in the last section.
Pickups are collected by walking over them, and are not destructible in any way. The exception to this are rad cans which can be viewed as props, but are listed on this page for simplicity.
Drop Rates
Ammo and health pickups are a bit complicated, so is instead fit into the following image to better explain. This also serves as a basic summary of other non-weapon pickups, fully in-depth explanations can be found in other sections below.
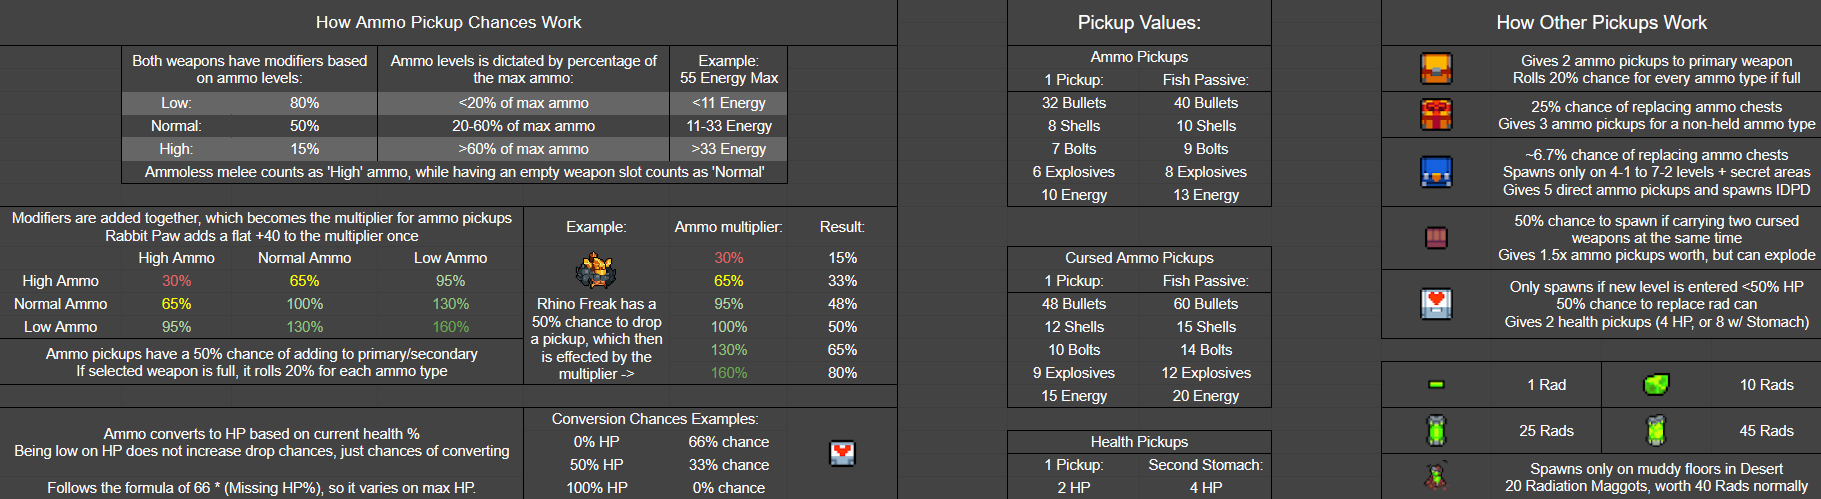 This image is clickable for full view!
The enemies page outlines the exact drop rate of each enemy, though the rest of the page is a WIP.
Only 14 enemies in the game are able to drop weapons normally and are always at a fixed rate. Crown of Guns adds a flat small chance to almost any enemy, while Heavy Heart serves as a multiplier.
Rads are guaranteed to drop the same amount from enemies every time. This fixed amount is only affected by Melting's passive (+1) or Crown of Blood (-1).
Despawn Timer
All pickups and rads will fade away after a few seconds and can no longer be collected, making it so some risks must be taken to maintain ammo/health levels and level up at a moderate pace. Chests and weapon drops will never despawn.
Pickups and rads have two phases before despawning.
Their first phase is appearing normally on the ground for for multiple seconds, but this time will decrease with every loop.
Their second phase they will repeatedly blink indicating they are about to despawn. This is always 2 seconds regardless of loop.
To determine how many seconds rads/pickups last for both phases combined, they use the following formula:
Rads: 2 + (X * 4) / (4 + Loop), with X being anywhere from 5 to 6.
Pickups: 2 + (X * 5) / (5 + Loop), with X being anywhere from 6.7 to 7.7.
Cursed Ammo Pickups: 2 + (X * 5) / (5 + Loop) / 3, with X being anywhere from 6.7 to 7.7.
Crown of Haste: Add a '/ 3' to the end of any formula to calculate its new despawn range.
The following table shows the minimum and maximum times that rads/pickups will exist for during the first few loops. As a reminder the last 2 seconds will be its fade out animation.
Loop: |
Rads Minimum: | Rads Maximum: | Pickups Minimum: | Pickups Maximum: |
| Preloop | 7 Seconds | 8 Seconds | 8.7 Seconds | 9.7 Seconds |
| Loop 1 | 6 Seconds | 6.8 Seconds | 7.58 Seconds | 8.42 Seconds |
| Loop 2 | 5.33 Seconds | 6 Seconds | 6.78 Seconds | 7.5 Seconds |
Ammunition
Characters starting ammo will be based on their primary starting weapon,
giving 3 ammo pickups worth to start with for that ammo type. This is
the same amount gained from a Present Chest.
For secondary starting ammo (Steroids and Weeklies), it will give 2 ammo
pickups worth which is equal to the amount gained from an Ammo Chest.
Ammo values for Fish will be listed on his character page.
Ammo Pickups |
|
|---|---|
Ammo Pickup
|
Upon collection gives a split 50% chance of giving ammo to either primary or secondary weapon. If both weapons are the same type or only one weapon is being run, it's guaranteed to give that ammo type. If the weapon picked is already at max ammo then it will randomly give any of the five ammo types, including the one that weapon is. Ammoless melee will also roll for a random ammo type. One pickup is worth:
|
Cursed Ammo Pickup
|
If two cursed weapons are being carried at a time then ammo pickups have a 50% chance to become a cursed ammo pickup instead. These will give 1.5 times more ammo than a normal pickup, but it start its fade out animation three times sooner than normal pickups. (Its fade out animation will always be 2 seconds.) One pickup is worth:
These pickups will never be attracted to the player, and must be walked directly over to collect even if the exit portal is open. The exception to this is Eyes' telekinesis, which can attract them. If an exit portal opens an ammo chest variant causing ammo pickups to spawn, these can also convert to cursed ammo pickups. |
Ammo Chests |
|
Ammo Chest
|
The default chest variation, when opened it will grant 2 ammo pickups worth to the players primary weapon. If the primary weapon is full or ammoless melee, it will grant 1 of the 5 ammo types randomly, not accounting for the secondary weapon at all. One chest is worth:
|
Present Chest
|
Present chests have a 1 in 4 (25%) chance of replacing normal ammo chests. These grant 3 pickups worth of ammo (or 1.5 times that of an ammo chest), but only to an ammo type that's not the players current primary/secondary weapons held. One chest is worth:
|
IDPD Chest
|
IDPD chests have a 1 in 15 (~6.7%) chance of replacing normal ammo chests, but only from levels 4-1 to 7-2. This means that Desert, Sewers and Scrapyards will never spawn these chests including in loop. All secret areas can see IDPD chests in place of ammo ones due to their numbering in the games code (such as 101-1 for Oasis). These give 5 ammo pickups directly on top of the player, which means that each pickup follows the 50% chance for primary/secondary. These can be cursed ammo pickups as well if carrying two cursed weapons. Upon opening it will also spawn an ambush, as four blue portals will appear spawning in IDPD units. If the exit portal is opened before the chest is, the level can be exited without needing to kill the IDPD. If a vault portal is actively open then no IDPD will spawn upon opening the chest. |
Weapons
There is a separate weapons page covering the drop pools and weapon mechanics. This section is just about the chests. All weapons from the current drop pool have an equal chance of appearing, besides the ones the player is carrying (unless Steroids).
Weapon Chests |
|
|---|---|
Weapon Chest
|
The default weapon chest variant, it will always contain one weapon from the current drop pool upon opening. Weapons will grant 2 ammo pickups worth of its ammo type upon walking over it the first time, whether by a chest or enemy drop. Exit portals will suck in nearby weapons, dragging them into the next level's spawn. Some secret area chests may have their weapon drop matching with another area as a bug. Results may differ if more weapons are added to the drop pool, or if one of the chests is cursed. Update 100: The 2-? (Pizza Sewers) chest will match the 3-1 chest. The 5-? (Jungle) chest will match the 5-3 chest. Oasis chest is independent of other areas. Update 99: The 1-1 chest will match the 1-? (Oasis) chest. The 2-1 chest will match the 2-? chest. The 5-1 chest will match the 5-? chest. |
Big Weapon Chest
|
Skipping any weapon chest variant adds +25% chance for a big weapon chest to spawn in the following level, giving a 100% guarantee after four are skipped. Opening a big chest resets this chance to 0%, while opening normal/cursed chests will keep the current chance. This will always contain three weapons from the current drop pool upon opening, giving ammo for each. |
Cursed Chest
|
Has a 1 in 7 (~14%) chance of replacing a normal weapon chest while running any crown. Crown of Curses changes this modifier to a 2 in 3 (66%) chance. Cursed chests include weapons from two drop pools ahead of the current one, giving a chance for better weapons sooner. The 9 weapons that drop on 1-1 are removed from this pool, better increasing chances of a better weapon. Cursed weapons cannot be swapped for non-cursed weapons, though there are methods for uncursing weapons. Explained in detail here. |
Health
Health Pickup
|
Health pickups give 2 HP upon collecting, or 4 HP with Second Stomach. Ammo pickups that drop from enemies have a chance of being converted into health pickups. The odds of ammo converting is based on the missing percentage of max HP. This means the lower the player is on health, the more likely ammo will be converted. The exact formula is 66 * (Missing HP%), meaning it is dependent on max HP. The max chance to convert ammo is 66% at 0 HP (Headless Chicken), while being at max health puts it at a 0% chance. Typically health levels will not affect enemy drops. The exception to this is when running any combination of weapons that are high on ammo; their negative modifiers will be reduced when low on HP to make drops more common. This starts at 62.5% of max HP and will scale the lower the player is on health. |
Health Chest
|
Health chests have a 50% chance to replace rad canisters if a new level is entered while missing more than 50% of max health. At 8 max HP this counts for 3 HP or below, while at 12 max HP this counts for 5 HP or below. Health chests give two health pickups worth which heals for 4 HP, or 8 HP with Second Stomach. If Chicken's max HP is lowered from going headless she still only needs to adhere to the 3 or 5 current HP to spawn health chests. Due to Rebel's passive she will never see health chests under normal circumstances. |
Rads
Radiation serves as the games form of experience points, explained in detail on the mutations guide.
Rad Drops |
|
|---|---|
Rads |
Each rad is equal to 1 experience point and is dropped by most enemies, with a few exceptions such as the IDPD. Rads have a much bigger pickup range than ammo/health, but will despawn slightly sooner. |
Radiation Chunk
|
Worth 10 experience points and is primarily dropped by larger enemies and bosses. |
Rad Canisters (or Rad Chests) |
|
Rad Canister
|
These are props that have 4 HP and must be destroyed to open. When destroyed 25 rads will burst out. Rad canisters can be destroyed in multiple different ways. This includes walking over it directly, player and enemy projectiles, as well as exit portals within proximity. Enemies that deal contact damage can only break rad canisters if they have a size variable of 3 or more, as rad canisters only have a size of 2. Contact Damage This chart does NOT apply to all props, only to ones that are size 2 such as rad canisters. |
Big Rad Canister
|
If a rad canister is skipped this will spawn in its place. These are props that have 20 HP and will break into 45 rads, in the form of 2 rad chunks + 25 normal rads. If a big rad canister is skipped it will result in Hostile Horror spawning, which can only happen once a run. If Hostile Horror is defeated than the next rad canister will be big again. Skipping big rad canisters after this will just result in repeated big rad canisters. Two rad canisters give 50 rads which is worth more than a big rad canister, making it not worth it to spawn usually. Hostile Horror can net quite a few extra rads but is a high risk strategy. (Taking Open Mind and skipping one Rad Canister could possibly result in three big extras potentially, which would be easily worth it.) |
Infested Rad Canister
|
Infested rad canisters will only spawn on muddy grey floors in Desert levels. These are props that have 8 HP. Upon opening this will burst into its typical 25 rads, as well as 20 Rad Maggots that each drop 2 rads upon death. Combined this comes out to 65 rads total. Rad Maggots also take contact damage from the player even without Gamma Guts, so walking directly over the infested rad canister can instantly kill all 20 while only taking 1 contact damage due to player iframes being active. Unlike other props that contain enemies, infested rad canisters must be destroyed in order to get the normal exit portal to spawn. |
Character Specifics
|
Rogue-specific |
|
|---|---|
Portal Strike Canister
|
Always replaces normal rad canisters while playing as Rogue. When opened it will grant one portal strike which can be used her active. Skipping portal strike canisters will provide no benefit, and Hostile Horror will never appear on Rogue runs. Also unlike other canisters, these are not props and can only be opened by walking over them or portals destroying them. |
Portal Strike Pickup
|
Only spawns if a portal strike canister is opened by an exit portal. It similarly gives one portal strike. In older versions these would drop from enemies rarely when running Rogue's Ultra A mutation Resourceful, but this was replaced with Super Portal Strike in update 93. |
|
Steroids-Specific |
|
Steroids Ammo Chest
|
Spawns in place of ammo chests while running Get Loaded ultra as Steroids. These give 2 ammo pickups worth for every ammo type when opened. Present chests will appear visually the same but give each ammo type regardless. IDPD chests are unchanged. If opened by an exit portal it will behave like a normal chest, spawning two ammo pickups. |
Steroids Weapon Chest
|
Spawns in place of weapon chests while running Ambidextrous as Steroids. It will always contain two of the same weapon, and give ammo for both. Big weapon chests will appear visually the same and give its typical 3 random weapons, but will include a 4th weapon that matches one of the other drops. |
Steroids Cursed Weapon Chest
|
Following the same conditions as normal cursed chests, contains two of the same cursed weapons when running while running Ambidextrous as Steroids. |
|
YV and Cuz-Specific |
|
Giant Weapon Chest
|
Y.V.'s Crib is entered upon taking either ultra as Y.V. or Cuz. This area will contain two giant chests that each contain 24 weapons, for a total of 48. This pulls from up to 5 difficulties higher than what is normally seen, meaning that if ultra is reached on 7-2 or later it will choose weapons from the full drop pool. Open Mind will give two more giant weapon chests in this area. (Only one extra pre-u100) |
Giant Ammo Chest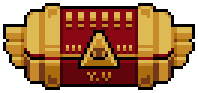
|
Replaces giant weapon chests in Y.V.'s Crib if running Crown of Love, which only allows ammo chests to spawn. Each of these chests will contain 24 ammo pickups, which is far more than needed to refill weapons. If the player manages to be carrying two cursed weapons, ammo from these chests can convert to cursed ammo pickups. |
|
Fish-Specific |
|
Pizza Chest 
|
Health chests will always appear as normal in Pizza Sewers, however they have a variant that spawns in only while running Fish's Confiscate in this area. These only appear as of u99r1 forwards. These function the same as health chests, healing for 4 HP normally or 8 HP with Second Stomach. If an exit portal opens these chests they will give two pizza slices (see below). |
Secret Area Pickups
|
Proto Chest
|
Appears in Crown Vaults if any crown is currently being run. Opening the first time will give a Rusty Revolver, a secret weapon that has no real function. If swapped out the weapon put into the proto chest will be 'stored', and can be retrieved later in that run or in other runs entirely, which includes playing as different characters. Dailies will always default to the rusty revolver but can store weapons from that run, while weeklies do not have crown vaults. Proto chest usage will cross over between the other game modes freely. This is the only chest that will not be opened by exit portals automatically, however if the chest is opened by the player within proximity of the portal it will suck in the nearby weapon preventing anything from being stored there. If there is no weapon left in the Proto Chest, it will default to Rusty Revolver next time. Proto chests are also tied to another secret weapon which unlocks a secret character. |
Clam Chest
|
Replaces normal weapon chests while in Oasis, with no special function. |
Pizza Box Pizza Slice 
|
Pizza boxes are props that have 4 HP and appear exclusively in the
Pizza Sewers. When broken they have a 20% chance to drop a pizza
slice, regardless of current HP. All health pickups are replaced with pizza slices in Pizza Sewers. These function the exact same as normal health pickups giving 2 HP each, or 4 HP with Second Stomach. |
|
Gold Chest
|
Gold chests are guaranteed to spawn in Y.V.'s Mansion, not allowing for other weapon chest variants to spawn. These have a special drop pool, only pulling from golden weapons. In preloop this includes golden variants of the Machinegun, Shotgun, Crossbow, Grenade Launcher, Laser Pistol and Wrench. These weapons can be unlocked for that character by entering the next level with it. (Does not work on weeklies specifically) In loop the gold chest has all 12 normal golden weapons as its pool, now including golden variants of the Assault Rifle, Slugger, Splinter Gun, Bazooka, Plasma Gun and Screwdriver. |
|
Cursed Big Weapon Chest
|
Guaranteed to spawn within the Cursed Crystal Caves as the weapon chest, even if no chests have been skipped. It will never appear outside of this area. Drops 3 cursed weapons upon opening that pulls from up to 3 difficulties higher, where normal cursed chests only pull from 2 higher. This means that weapons that are only typically found early as Labs or early Palace could appear here. |


