Be aware that some of these mechanics may be particularly advanced, and requires knowledge from other pages to understand.
Information on the sheet is based on whoever is willing to volunteer information about their runs. Screenshots can be shared in the NT Discord via the dailies and weeklies channel, where a sheet editor can add the information in.
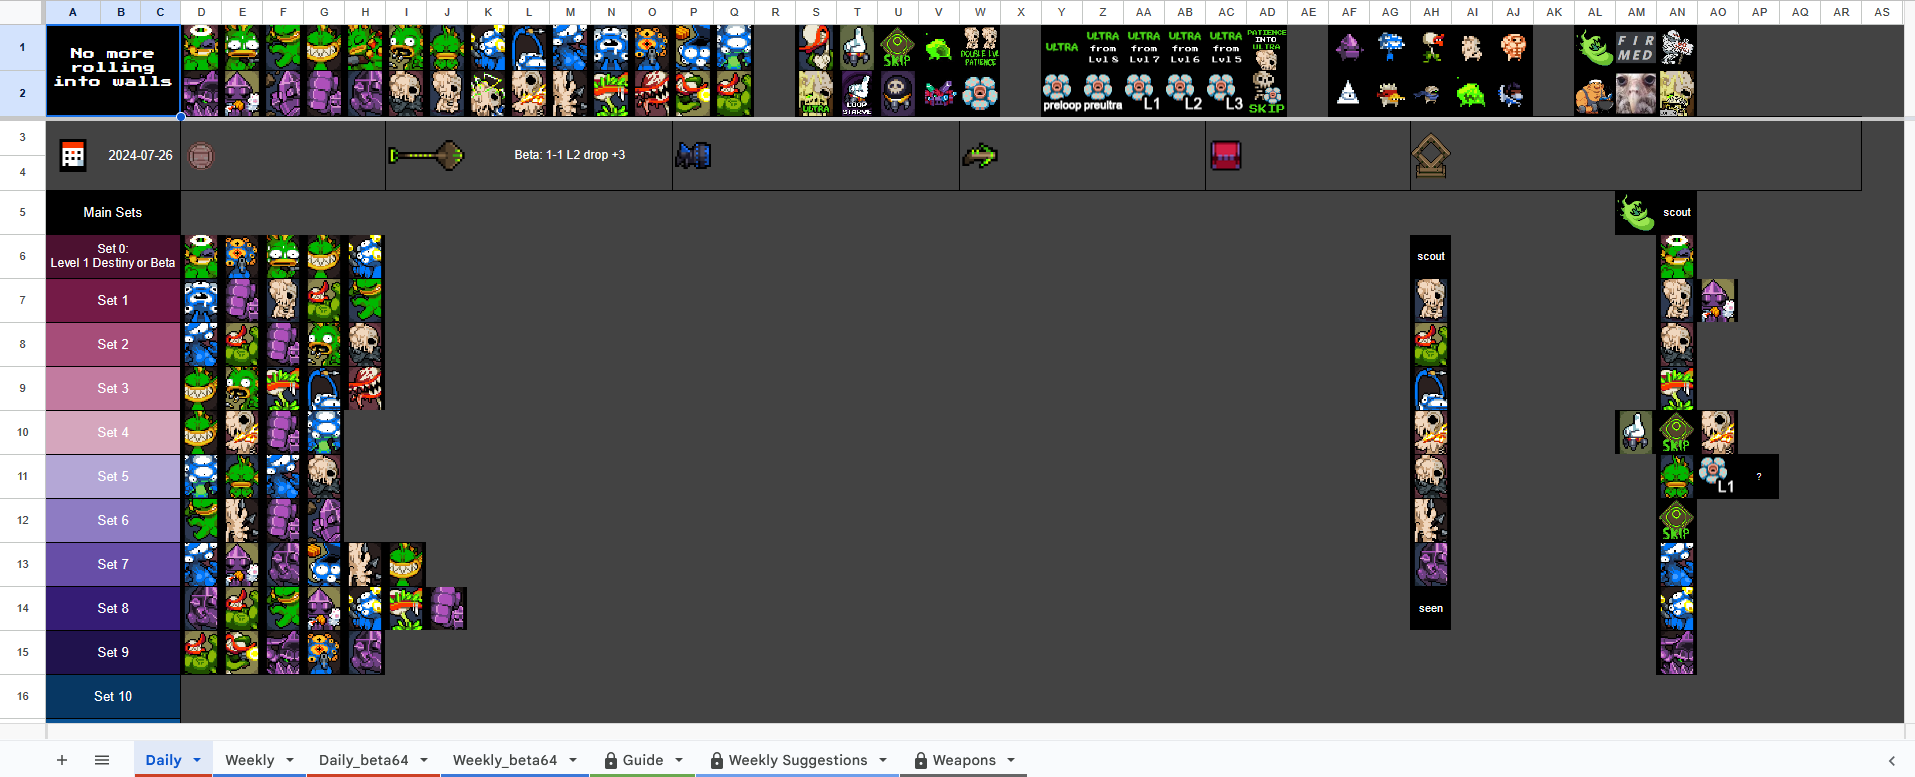
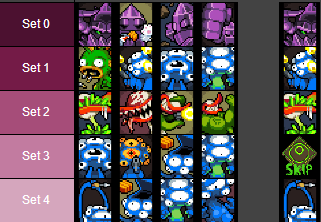
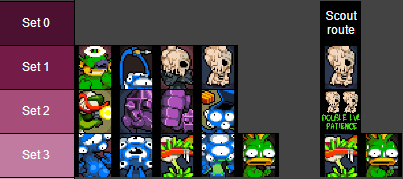
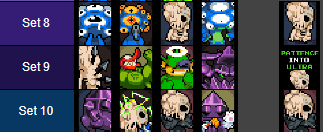
The following images are a 'sample' image of what the daily scouting sheet looks like. Everything can be categorized through the row numbering on the far left;
There are also multiple tabs on the bottom to switch views. The first four are for the daily/weekly challenges being scouted while the 'Guide' tab is a shortened version of this page.
For the sake of this guide 'Non-Beta' will be used for u99r1 which is the default Steam version, while 'Beta' will be used for any Steam beta branch or Switch version.
Everything listed here is as it appears on the sheet with an in-depth explanation. More relevant mechanics will be closer to the top.
Particularly niche mechanics will be listed near the bottom. These ones rarely come up in runs unless if done on purpose. Most of Skeleton's set mechanics are on a separate page as these are absurdly uncommon.
Non-Set Mechanics
|
Current Daily 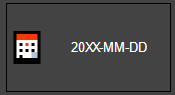 |
- Displays the current daily in year-month-day format.
- The date needs to be manually updated by a sheet editor. Current date is UTC based to reflect current daily.
- If it is the wrong date it will automatically update to have a red background. This is a signifier the daily sheet is still from a previous day.
- The red calendar signifies this is on the daily sheet, while blue is for the weekly sheet, as these appear in-game.
|
Wrong Daily 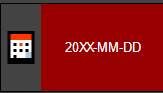 |
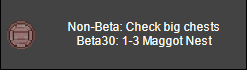
Pizza Entrance  |
- The manhole cell is used to signify if there is access to preloop Sewers.
- The purpose of this is to increase difficulty and a few extra rads, which can sometimes be the difference for an extra level up by 3-2 for Destiny strats.
- Grenade Launcher appears on 1-1, while the 2-1 chest can sometimes see Toxic Launcher or Bazooka.
- Chests are shared between the 2021 Beta and Non-Beta. However drops from enemies will vary based on version as well as FPS values.
- Whether big chests spawn vary based on version/FPS, so the cell information should include how many weapon chests were skipped.
- (Skipping four chests gives a guaranteed 100% chance, however this does not apply as there are only three chests before 2-1)
- Example: For Non-Beta, the grenade launcher doesn't appear from any enemy drops/chests. Whoever plays next can check for big chest spawns.
- For 2021 Beta, it specifies beta30 meaning it was seen on 30 FPS. It drops from an enemy on 1-3, which specifices what it was in this case.
|
 |
Meta Weapon Drops    |
- Weapon cells are used to indicate where meta weapons drop.
- Ultra Shovel is for normal meta, Ultra Crossbow for ranged meta, and SPC for both.
- For weapon chests:
- Non-Beta and 2021 Beta shares chest drops, so version and FPS does not matter.
- Difficulty does not factor into chest drops once the weapon pool is filled out, typically around 2-1 L1.
- On Non-Beta the 2-1 and 2-? chests share the same weapon. The same goes for 5-1 and 5-? chests.
- On Betas the 2-? chest and 3-1 chest shares the same weapon. The same goes for 5-? and 5-3 chests.
- Whether cursed chests spawn can depend on version and crown, and can give different drops than normal chests.
- HQ Chests have poor documentation, but seem to differ based on version.
- (For weeklies) Crown of Hatred will give different weapons depending if the chest is walked over directly or opened by a portal.
- For weapon drops:
- Difficulty and version always effects weapon drops, as well as different FPS values on beta versions.
- Big Dog gives a guaranteed weapon drop. This is purely random on Non-Beta, while seeded on Betas.
- Enemies that spawn midway through the level have random weapon drops. Normally includes Laser Crystals spawned from Hyper Crystal, but can also include any other revived/spawned enemies while running Crown of Guns.
- Weapon drop/chests can vary from normal runs when running Open Mind, Confiscate, Ambidextrous or Robot.
Difficulty Explanation
- Difficulty is the number of portals entered. Extra difficulty can be gained by entering additional portals.
- Additional portals include entering Vaults, Pizza Sewers, IDPD HQ and usually YV's Crib.
- Numbering is a simple +1 for each extra portal entered, regardless of which of these areas it is.
- YV's Mansion, Cursed Crystal Caves and Jungle are replacement areas and thus do not add additional difficulty.
- Oasis will skip areas thus has negative difficulty and should be specified for runs that happen to include them.
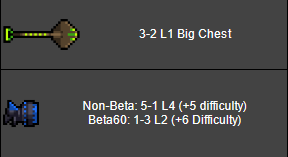
- Example: The cell for Ultra Shovel shows that it's inside a big chest on 3-2 L1, which is the same regardless of version. Skipping four weapon chests can guarantee this to spawn.
- The cell for SPC has two versions on it. Non-Beta has its first sighting on 5-1 L4 with +5 difficulty, which can use any combination of extra portals such as 3 Vaults and 2 Pizza visits.
- For 2021 Beta it specifies beta60 as it was done on 60 FPS, and it appears much earlier on 1-3 L2. +6 difficulty is a high number at this point, so it likely means that IDPD HQ was visited at some point along with vaults and pizza.
|
 |
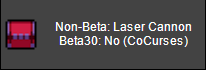
Cursed Chest  |
- The cursed chest cell is used to signify if there is access to Cursed Crystal Caves in preloop.
- This is done for extra rads which can occasionally come in use for preloop Jungle (if Last Wish is in a later set), or a high level destiny.
- Similar to other cells, this can depend on crown, version and FPS values.
- If the cell does not specify crown used on the daily sheet, assume that Crown of Curses was taken for 3-3.
- Example: The cell specifies that for Non-Beta there's a cursed laser cannon on 3-3, which by default would be running Crown of Curses.
- As for the 2021 Beta, it specifies that on 30 FPS version that there is no cursed weapon while running Crown of Curses.
|
 |
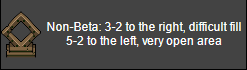
Vaults  |
- The vault cell signifies the vault locations on 3-2 and 5-2 durng preloop, for the sake of making Destiny radstarving easier.
- 1-2 L1 is usually an open area with a high enemy count and is rarely mentioned.
- Extra information is sometimes included, such as if there is particularly few enemies or if reaching a certain level in time is barely possible.
- This cell is infrequently filled out, but sees usage on dailies with particularly awful vault locations or on a perfect meta daily.
- Location of the vault depends on version and FPS used.
- Example: The cell just specifies the Non-Beta location. On 3-2 it's a bad fill, so the player should rush to the right to get the vault open before killing too many enemies.
- Meanwhile for 5-2 it's a very open area, meaning that it's likely an easier fill but collecting rads on accident could easily happen.
|
 |
Common Set Mechanics
|
Patience  |
- Patience will reroll the current set.
- The new set will be given upon finishing the following level.
- Patience can only be taken once per run. It will be removed from the mutation pool after selected.
|
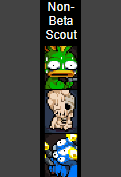
- On Non-Beta Patience will simply advance the current set number by one.
- (See Double Lvl Patience for interactions with multiple level ups.)
- (See Patience Into Ultra for interactions when hitting ultra.)
- Example: The Non-Beta scout takes Patience which simply skips the current set, they'll then see the next set after the current level.
|
 |
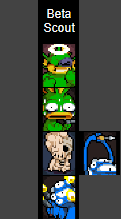
- On Beta this is a separate set entirely. The Patience set is listed below in a separate section from main sets.
- Patience will always give the same set regardless of when it is taken that run.
- For suggested/scout routes, the mutation from Patience will be listed directly to the side.
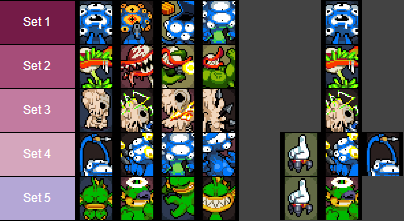
- Example: The Beta scout takes Patience which will give them a unique set after completing the next level.
|
 |
Level Ultra  |
- Used to signify when ultra is taken in a route.
- In Non-Beta, this is relevant to show set progression in terms of Last Wish.
- In Beta this is used mainly just to signify when a route ends.
|
Last Wish  |
- Last Wish will serve as a delayed reroll.
- The new set will be given upon entering Jungle, which can be done on 5-1 regardless of loop.
- Once Last Wish is consumed the mutation will be removed and re-enter the mutation pool, meaning that Jungle can be visited multiple times in a run.
|
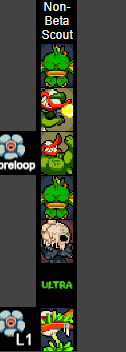
- On Non-Beta this will simply advance the current set number by one.
- Ultra will 'skip' a set, so visiting Jungle after ultra is reached will be after a skipped set.
- Example: The Non-Beta scout takes Last Wish. In pre-loop they visit Jungle and get Back Muscle, the cell is put there to signify when Jungle was entered as Last Wish re-enters the mutation pool for the scout.
- The scout takes Last Wish a second time and then hits level utlra, which causes a set to be skipped. Upon reaching L1 Jungle they then see a set after the one that ultra skipped.
|
 |
- On Beta this is a separate unique set like Patience. It is listed below all the main sets.
- Each additional Jungle visited is a different unique set, such as Jungle 1, Jungle 2, Jungle 3.
- Jungle 1 will always be seen first whether Jungle is visited in preloop or in loop first.
- Example: The Beta scout takes Last Wish and sees Jungle 1, which they visited in preloop.
- The scout then takes Last Wish a second time in a later set. Entering Jungle again they see Jungle 2, which they saw in Loop 1. This mutation is put to the right of ultra just to signify it was the last mutation taken in the set.
- (Note: Some Beta scouts always just put their Jungle visit directly to Last Wish regardless of where they entered, so pay mind to this as a route may be difficult to accurately determine.)
|
 |
Vault Skipping  |
- Beta mechanic only.
- Stepping on a crown pedestal directly will skip the next set.
- As three vaults spawn in a run, this means that up to three sets can be skipped.
- Awakening the crown guardians first instead of stepping on the pedestal will result in no vault skipping happening.
- In other words, only if crown selection is seen, does it mean that a set is skipped.
- Jungle is not effected by vault skipping.
- Patience is normally not effected by vault skipping.
- The exception is if Patience is taken when entering a vault, the patience set will be skipped and will simply show the next set in its place. Functionally this works the same as u99r1 patience advancing the set by one.
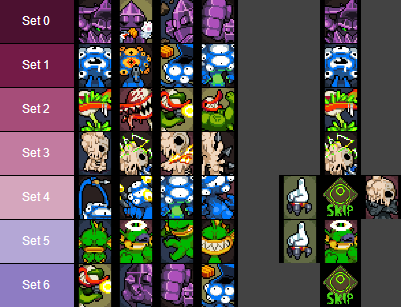
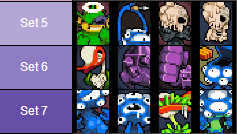
- Example: After seeing Set 3 (Level 4 in this case), the route visits a vault in order to skip Set 3 with mutations that are not meta.
- Upon reaching Level 5, Set 4 will now be given.
|
 |
Destiny  |
- Crown of Destiny gives one extra mutation upon taking the crown, or completing 1-1 on the weekly.
- Only one mutation is seen for all the following sets including ultra. Downside can be avoided by swapping off the crown.
- Avoiding leveling up between 3-2 and 5-2, or between 5-2 and 1-2 L1 is called 'radstarving'.
- On Dailies picking up all rads can expect level 4 or 5 by 3-2, rarely level 6. These are most common for destiny strategies.
- Last Wish will never appear while running Crown of Destiny, unless if playing specifically as Horror.
- Horror can see two mutation/ultra slots per level up.
- (Include CoDestiny bug and also Ultras)
|
- On Non-Beta, the mutation given from destiny will be the first mutation slot from the last set seen.
- Leveling up will simply progress to the first slot of the next set. This includes visiting Jungle.
- If Patience is taken before entering a vault and then Crown of Destiny is taken, then Destiny will still grant a mutation from the set Patience was in. Only after it is taken does Patience give a new mutation from the following set.
- Example: Upon reaching set 4, Trigger Fingers is taken. The mutation given from Crown of Destiny is Long Arms, thus is to the right of it.
- A Destiny icon is also on the next mutation, meaning it is safe to level up once. As Last Wish cannot appear from Destiny, leveling up grants Strong Spirit instead.
|
 |
- On Beta, the mutation given is from a unique separate set.
- Leveling up will simply progress to the first slot of the next set, like Non-Beta. There is only one unique Destiny set.
- For dailies, Destiny will cause multiple vault skips which means skipping multiple sets.
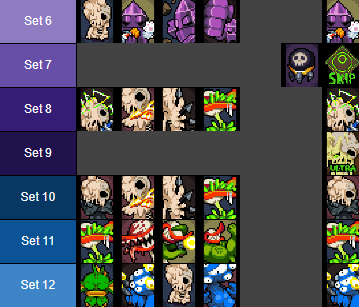
- Example: After reaching level 5, set 3 is seen. Destiny is taken afterwards which pulls from the unique Destiny set listed below all the main sets. Set 4 is skipped, and Rhino Skin is given.
- Similar to the Non-Beta route, one level up occurs which gives Strong Spirit as the first slot, as Last Wish cannot appear from Destiny.
- Set 6 is then skipped upon taking Crown of Destiny off in the next vault. The next level up will show Set 7.
|
 |
Loop Starve  |
- Used to signify when Crown of Destiny should be taken on 5-2, and then taken off on 1-2 L1.
- Radstarving is more difficult for these areas, so it's only usually done for especially good dailies or if playing as Horror.
- Example: A Non-Beta starve that uses Horror. Long Arms is taken upon reaching Set 7, as Horror can see 5th slot mutations, and then Scarier Face is gained from Crown of Destiny.
- Horror sees 2nd slots in Destiny as well, so leveling up once to see Trigger Fingers is safe. Crown of Destiny can be unequiped on 1-2 L1, in order to let Horror pick any of his ultras.
|
 |
Detachment  |
- Used in place of the Ultra icon, for routes that uses Detachment.
- There is a full explanation here (provide sub-link later).
- As a summary, it cuts Melting's current HP by half and gives 3 mutations in return.
|
- On Non-Beta, Detachment will show the last two sets seen, and then one set afterwards.
- For instance if Set 8 was the last set seen before hitting ultra, then Detachment will give sets 7, 8 and 9.
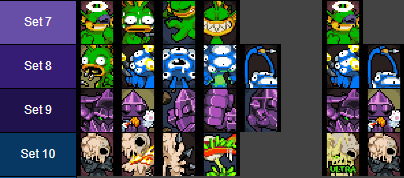
- Example: The scout ends on Set 9 where they take Scarier Face to end their normal route with.
- To the right the 3 mutations gained from Detachment is listed, corresponding with what set they came from.
- Long Arms was a 5th slot now uncovered as Set 8 is seen a second time. Rabbit Paw is taken in Set 9 which is seen a second time, and then Rhino Skin appears in Set 10 which is seen for the first time.
- If Jungle is entered afterwards, simply progress one set forward as usual.
|
 |
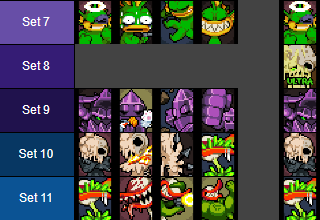
- On Beta, taking Detachment will skip a set, and then give 3 new mutation sets following that.
- Seemingly the only way ultra interacts with sets on Beta.
- Example: The route sees Set 7 last, and then takes Detachment. Set 8 is skipped giving them Set 9, Set 10 and Set 11.
|
 |
Crown of Death  |
- Signifies when Crown of Death should be taken in a route as Melting, as he can take both Detachment and have 6 max HP.
- This simply entails taking Crown of Death before reaching ultra, and then taking it off in any vault afterwards. If both vaults are visited in preloop, this strategy will not work.
- Explained: Taking Crown of Death reduces max HP to 1. Detachment halves HP, which keeps it at 1. If Rhino Skin is gained from Detachment, max HP is increased to 5. Once CoDeath is unequipped, max HP will become 6.
- Going through Oasis reduces the need to radstarve and is recommended.
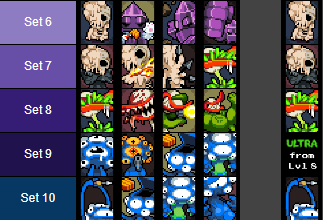
- Example: A beta route that skips set 7 upon entering vault and takes Crown of Death.
- One more level up is done to get Laser Brain, and then Detachment is taken which vitally includes Rhino Skin.
|
 |
Ultra Skipping  |
- Non-Beta only mechanic.
- If leveling up and reaching ultra is done on the same level, ultra will always skip the next immediate set.
- Mutation choices will display before the choice of ultra, however.
- 'Ultra from Lvl 8' entails radstarving while at level 8 until a rad-heavy area is reached, and then level 9 and ultra are hit before the exit portal.
- Mom on 2-1 L1 is a decent early radfarm but is risky for longer farming. Hyper Crystal on 4-1 L1 is better.
- Uskipping is usually only employed as Horror as he trivializes radstarving.
- If Jungle is entered after a uskip, simply progress one set forward as usual.
- Example: The route purposefully does not level up after hitting level 8. Once a radfarm opportunity arises, level 9 and ultra is gained at the same area.
- Once the area is exited, set 9 will be skipped and set 10 will immediately be shown instead, giving Long Arms.
|
 |
Uncommon Set Mechanics
|
Heavy Heart  |
- Always appears in the next set after taking 3 weapon-specific mutations.
- (Any 3 of Boiling Veins, Bolt Marrow, Laser Brain, Long Arms, Recycle Gland, Shotgun Shoulders)
- Will REPLACE the first slot mutation of the next set seen.
- Can be granted by crown of destiny, however will only ever appear once a run.
- This means for Non-Beta if Heavy Heart is seen in a set, and then Destiny is taken for that set, the mutation that Heavy Heart was covering is revealed.
- If Heavy Heart is placed on the normal sets that means that the mutaiton underneath it is unknown. Scout routes can be used to deduce what the mystery mutation can't be.
- Example: Heavy Heart doesn't actually appear in set 6, it's simply what the scout saw. Any mutation that the scout did not take could be underneath Heavy Heart, besides other mutations in that set.
|
 |
Double Level Patience 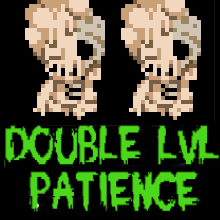 |
- Non-Beta mechanic only.
- If two sets are seen at once and Patience is taken first, a set will be skipped and give one from the following set instead.
- The same set will be given again after completing the next level from Patience.
- Most commonly done on accident during Desert during early leveling, going to CCC, or entering Jungle while leveling up.
- If multiple sets are seen at once but Patience is taken last, it just functions as normal.
- For 3 or more sets seen at once, taking Patience will still skip the next set, but the last set seen is the set that is granted twice.
- Example: The scout levels up twice and takes patience in set 1. It then skips set 2 and immediately gives them set 3. Upon completing the next level, they see set 3 a second time, in which they take Stress which is now uncovered.
|
 |
Patience Into Ultra 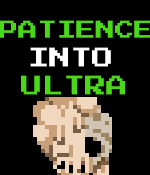 |
- Non-Beta mechanic only.
- If Patience is taken and ultra is hit before the next level is cleared, a set is skipped and Patience takes the one after that.
- Most commonly done on accident during loop Desert due to the very high rad counts.
- Example: The scout takes patience in Set 8 but hits ultra before completing the next level, so they see Set 10 instead.
|
 |
Hostile Horror  |
- Used to signify if a route spawns Hostile Horror, which is used if extra rads needs to be gained by 3-2 for destiny.
- Skipping 2 rad cans spawns Hostile Horror, who can give up to 115 rads.
- Opening 3 normal rad cans gives 75 rads. This is not a huge difference, but can close the gap for tight leveling.
- Example: A Non-Beta route that has a level 5 destiny, the inclusion of Hostile Horror means that the route maker only reached high level 4 on 3-2.
|
 |
Cursed Crystal Caves  |
- Used to signify if a route uses CCC, as it has a very high rad yield for preloop.
- Loop starving sometimes requires a particularly high level to be reached.
- Visiting preloop Jungle at a higher level means Last Wish is re-added to the mutation pool later, which can prevent uncommon situations where it covers an essential mutation.
- Example: CCC is used to reach level 7 before 5-1. If visited at level 6, Last Wish may have pushed Laser Brain to 5th slot, covering it.
|
 |
Skeleton Jungle Skip  |
- Non-Beta mechanic only.
- If Melting enters Jungle before transforming into Skeleton it will permanently advance the set number.
- This means that visiting preloop Jungle as Melting, then transforming to Skeleton afterwards, he will start on Set 2.
- On the other hand, becoming Skeleton and entering Jungle on the same level will not skip any sets, he will still start on set 1 if it's the first Jungle visit.
- Example: Melting's route visited preloop Jungle, so Skeleton starts on Set 2 rather than Set 1.
|
 |
These icons largely start as memes on the NT Discord and get used on the daily sheet, usually as a way to label a route. These are not mechanics in any way and thus does not have to be treated seriously.