Main Areas Overview
Page Contents
Nuclear Throne has a total of 7 main areas, with an 8th in loop.
The following page will go over each of main area including their level generation, enemy behaviors and
props.
However, much of this is only a summary from other pages. Please see the enemies
(WIP) and
props page for fully in-depth information.
At the end of each area section the exact spawnrates for every enemy is given.
Loop spawn rates are not a guarantee, rather every enemy that spawns
has a chance to pull from that pool instead of the normal spawn pool.
For example, Loop 1 every enemy has a 25% chance to pull from the loop spawn pool, and a 50% chance
on Loop 2. Full explanation.
Desert
The Desert is the first area in the game and consists of three levels: 1-1, 1-2 and 1-3.
Typical level generation for the Desert includes wide open areas with branching side rooms and hallways, often with chests at the end of them.
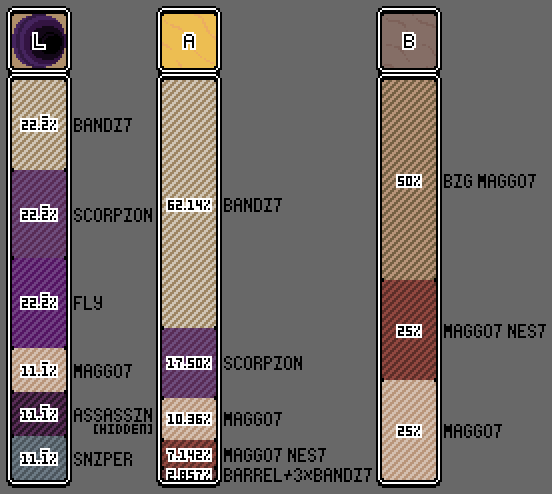
Enemies |
||||||
Bandit |
Maggot |
Rad Maggot* |
Maggot Nest
|
Big Maggot
|
Scorpion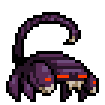 |
Gold Scorpion
|
Bandits are the most common enemy in the Desert, although pose minimal risk on their own as they
fire infrequently and inaccurately.
Scorpions are also fairly common and pose more risk, firing pellet barrages while clinging to corners in the
level.
Less common spawns include wandering Maggots which can only do contact damage, and Maggot Nests which bursts
into more Maggots.
The Desert can also generate alternate muddy flooring, which has different spawn rates on them.
The most common are Big Maggots which have the ability to burrow around, and will also break into Maggots upon
death.
Maggots and Maggot Nests are the other viable spawns for muddy flooring,
making them common spawns on level generations with lots of mud.
On 1-2 and 1-3 Scorpions have a small chance to spawn as their elite variant, Gold Scorpion, which are far more dangerous to handle and will fire huge barrages of both fast and slow moving pellets.
Props |
||||||
|
Infested Rad Canister 
|
Barrel |
Bone Pile |
Cactus  
|
Rotting Cactus  
|
Big Skull |
|
If a Rad Canister spawns on muddy flooring it has a chance to instead spawn in as an Infested Rad Canister. When broken it will cause 20 Rad Maggots to burst out, which behave the same as normal Maggots except that they move faster and will take contact damage from the player even without Gamma Guts.
The only other hazardous prop are Barrels which explode upon destruction, damaging the player and enemies
alike.
Barrels in the Desert will also always spawn 3 Bandits by them, which is mentioned in the screen tip "Bandits
like camping near barrels".
The other props in the Desert are all harmless, including the Bone Pile, Cactus and Rotting Cactus.
The Big Skull is also harmless and will provide a hint towards the Desert's secret
area, although is not required for it.
Starting from Loop 1 the Proto Statue prop will spawn on 1-2, which is also linked to a secret area.
Boss |
Big Bandit
|
The boss for this area is Big Bandit, who spawns on 1-3.
Once 10% of the enemies in the level are killed, Big Bandit will burst out of a nearby wall to fight the player.
(This is 10% of the enemy count before clusters are accounted for, meaning that in loop Big Bandit may appear
later than expected.)
His main form of attack is a bullet barrage which he is temporarily locked into until completing.
If the player gets too close to Big Bandit or is behind any walls while still nearby, Big Bandit will charge
instead which does very high damage.
If the player is far away enough from Big Bandit he will start to wander around the level instead. Due to his pathing he will end up hugging walls, moving in a clockwise rotation around the level until the player is located.
Loop Version: Every loop will include more Big Bandits, following the formula of Big Bandits =
Loop * 2.
He will also attack much more aggressively, changing his bullet barrage mid-attack which no longer locks him
into one spot.
He will also charge much more frequently.
Loop Enemies |
||||||
Assassin
|
Sniper |
Jungle Fly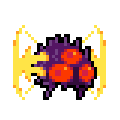 |
||||
Loop Desert is significantly more difficult than preloop, especially if suitable weapons have not been found yet. The high volume of enemies makes the open area generation much more dangerous.
Jungle Flies are now a common enemy, which will put a lot of pressure on the player by spawn between their
aggressive contact damage and spewing out Maggots.
Fairly common spawns also include Assassins which adds to the pressure by spawn, and Snipers which makes any
open areas more dangerous to be caught in.
During loop, Gold Scorpions become far more likely to replace normal Scorpions on 1-2 and 1-3 levels. 1-1 will
always have normal Scorpions only.
Gold Scorpions are guaranteed to replace all Scorpions by Loop 6 normally, or by Loop 4 while running Crown of
Blood.
Spawn Rates
Loop spawn rates have a chance of replacing the normal spawn pool for every enemy spawn. This chance becomes more likely with every consecutive loop.
Sewers
The Sewers are the second area in the game and is a transitional area consisting of only one level: 2-1.
Typical level generation for the Sewers includes many long hallways which lead to some small open rooms. Chests
will commonly spawn at the end of long hallways in corners of the level.
As a transitional level it is dark, meaning that visibility is limited.
Enemies |
||||||||
| Bandit |
Rat |
Green Rat |
Big Rat
|
Gator |
Buff Gator
|
Ballguy |
Toxic Ballguy
|
Assassin
|
Rats are the most common enemy in the Sewers, which will run around randomly on their own or at the player when
in sight.
They only deal low contact damage but have strength in numbers, particularly when fought in open rooms.
Normal Bandits from the Desert are also commonly seen in this level.
Big Rats are an uncommon spawn. They will spew out Green Rats when having line of sight with the player, where
Green Rats behave the same as normal Rats.
Big Rats will only spawn a certain amount of Green Rats, and once this threshold is passed they will charge if
the player gets too close.
Another uncommon spawn are Ballguys, which will bounce around the level aimlessly. If the player is in their line
of sight they will try to change their trajectory to make contact instead,
and will explode into pellets if making contact or is killed.
If a Ballguy makes contact with any toxic particles (through Toxic Barrels, or player weapons) they will become
Toxic Ballguys, which repeatedly fire out pellets while walking around and will
burst into toxic gas upon death, which harms both the player and enemies.
The Sewers can also generate green tile flooring, which has different spawn rates on them.
Common spawns include Rats again but also have an equal chance of spawning Gators, which will fire a spread of
shotgun pellets and are dangerous at close range.
Ballguys also spawn far more frequently on green tiles.
Gators also have a chance to spawn in as their elite counterpart, Buff Gators, which are extremely dangerous as they fire flak balls at the player very quickly which has the potential to do high damage, depending on its angle.
On the normal flooring Assassins also have a very rare chance to spawn, only becoming more common in the
Scrapyards.
They will usually play dead until the player gets close enough, suddenly popping up to attack.
They will run towards the player with erratic movements that are hard to predict, and will deal high melee
damage in close range.
Props |
|
Toxic Barrel |
Sewer Pipe |
There are only two props in the Sewers, with one being harmless Sewers Pipes.
The other prop is Toxic Barrels, which are a more dangerous variant than Desert Barrels.
They will explode upon destruction and then spread toxic gas, all of which can harm both the player and enemies
alike.
While not a prop, a manhole cover will spawn on the ground somewhere in the level. This is linked to a secret area.
Loop Enemies |
||
|
Laser Crystal |
Super Fireballer
|
Buff Gator
|
The loop spawn pool will make Rats spawn far less frequently, as Big Rats and Ballguys become common enemies in their place.
Fairly common spawns from the loop pool now include Laser Crystals and Super Fireballers which makes moving down any longer hallways difficult, or trying to hold one spot in any open area.
Buff Gators are also added to the loop spawn pool independent of normal Gators, not requiring green tile flooring
to spawn.
On top of this Gators that do spawn have an increasingly higher chance of becoming Buff Gators, guaranteed to be
replaced by Loop 5 normally, or Loop 4 with Crown of Blood.
Loop Boss |
Mom
|
Loop will also add a boss for this area, being Mom.
She will always spawn in during level generation, typically far away from where the player
would spawn.
Her main attack is her toxic blast which she fires in the direction of the player. These will also
destroy walls which will chip away at any cover over time.
Mom will also lay eggs around the level which if not destroyed in time will spawn as Ballguy enemies.
These can easily become Toxic Ballguys due to the frequency of her attacks.
Loop Scaling: Every loop Mom will lay more eggs when using this attack.
She will also accelerate faster each loop with an increased max speed, with late-game runs having her be the
fastest entity in the game.
Spawn Rates

Loop spawn rates have a chance of replacing the normal spawn pool for every enemy spawn. This chance becomes more likely with every consecutive loop.
Scrapyards
The Scrapyards are the third area in the game and consists of three levels: 3-1, 3-2 and 3-3.
Typical level generation for the Scrapyards include many mid-sized rooms
connected through long hallways.
3-3 will generate differently, always being one large open area with very little coverage.
Enemies |
||||||
| Bandit |
Raven |
Assassin
|
Sniper |
Salamander
|
Ballguy |
Toxic Ballguy
|
The most common enemy in the Scrapyards are Ravens which fires quick volleys of bullets
at the player. They are also able to fly, changing their location which
lets them flank.
Snipers are somewhat common spawns and can fire at the player from any distance,
indicated by their laser sights right before firing. They will explode upon death.
Bandits are still common spawns in the Scrapyards, while Ballguys and Assassins return
from the Sewers as semi-common spawns. Some Assassins will spawn without their hiding phase,
immediately ready to attack the player.
The Scrapyards can also generate green grass flooring, which has different spawn rates on them.
The most common enemy becomes Salamanders, which breathes fire covering a large area while just doing
chip damage. On normal flooring, Salamanders are just uncommon spawns.
Props |
|||
Tires |
Car Wreck |
Venus Car Wreck |
Venus Car Fixed |
There are two common props including harmless Tires and dangerous Car Wrecks.
When Car Wrecks are destroyed they will burst into multiple explosions, having much more
range than any barrel.
Cars can also appear on walls. If that wall is destroyed it will also cause
explosions to happen.
Both Cars as props and within walls can be destroyed by exit portals, a
common death for newer players.
Some walls may appear as fire traps instead, which shoot flames in a predictable horizontal and vertical pattern. They can be broken like any normal wall.
There is also a Car variant called Venus Car Wreck on 3-1, which if it is fixed using a specific weapon will lead to a secret area.
3-2 will have a Proto Statue prop spawn, which is linked to a different secret area.
Boss |
|
Big Dog |
Big Dog Missile |
The boss for this area is Big Dog, who spawns on 3-3.
He will always spawn during level generation but in his sleeping phase,
only initiating the fight if the player wakes him up.
His main attack is his bullet spin, which will fully cover the area around him
while giving some gaps to move through.
He can also spawn Big Dog Missiles which will slowly move towards the player,
exploding after being destroyed or bumping into walls too much.
Loop Version: Big Dog's spin attack will now include more bullets,
making it more difficult to dodge without melee.
He will also shoot out more missiles every loop, and each of these missiles can fire their own bullets
rapidly.
Big Dog's HP scaling will be at a far faster rate than any other boss.
Loop Enemies |
|
|
Buff Gator
|
Snowbot |
The possible loop spawn pool will make Snipers, Assassins and Ravens as equally common, with Salamanders being somewhat common now as well.
The other somewhat common spawns now include Buff Gators which always have a chance of dealing very high damage, and Snowbots who still charge around and can pick up Car Wreck props, similar to their behavior in the Frozen City.
Spawn Rates
Loop spawn rates have a chance of replacing the normal spawn pool for every enemy spawn. This chance becomes more likely with every consecutive loop.
Crystal Caves
The Crystal Caves is the fourth area in the game and is a transitional area consisting of only one level: 4-1.
Typical level generation for the Caves includes many open rooms often with
long branching hallways. As a transitional level it is dark, meaning that visibility is limited.
Some of the level's flooring may include webs, which will significantly slow down the player
but not enemies.
There is a secret area for the Crystal Caves.
Enemies |
||||
| Bandit x 3 |
Spider |
Laser Crystal |
Gator* |
Buff Gator*
|
There are only two enemies that will mainly spawn in the Caves.
Spiders are the most common of the two and will wander about, running
at the player if they get too close to try to deal contact damage.
The other enemy is Laser Crystals which is still fairly common, they will
float around aimlessly and will do a lethal amount of contact damage if touched.
When they have line of sight with the player they will charge up a laser beam
which is telegraphed through glowing particles in the direction they're firing.
The laser beam does small damage but can multi-hit very easily.
Bandits will also spawn in this area guarding each of the chests and rad canister, meaning that only 3 will be seen. (Or 5 with Open Mind.)
Props |
|
| Crystal |
Cocoon |
The props in this area includes harmless Crystals which provide an extra light source, as well as Cocoons which have a chance to spawn either a Gator or Buff Gator enemy when destroyed.
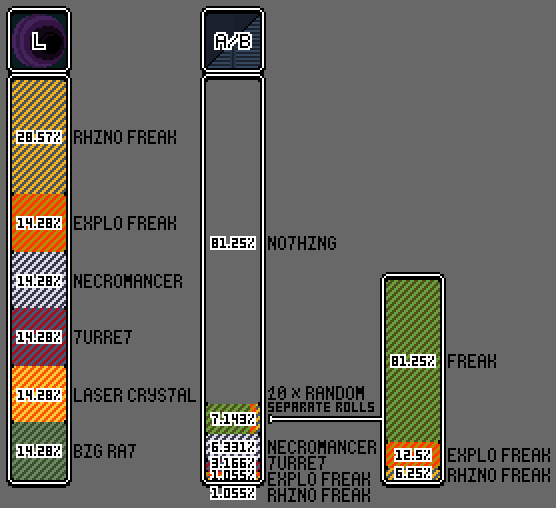
Loop Enemies |
|||
|
Lightning Crystal |
Buff Gator
|
Explo Freak
|
Rhino Freak
|
The possible loop spawn pool will now make Laser Crystals more frequent than Spiders, with both being the most common enemies still.
The other four enemies have an equal chance of spawning.
The first of these are Lightning Crystals which will behave similarly as
Laser Crystals, but instead of lasers they will fire lightning
in their immediate vicinity. This makes them more dangerous in close range
than Laser Crystals, but are easier to deal with from a distance.
Buff Gators and Explo Freaks spawning here can easily take the player
by surprise in the dark, similar to Sewers/Labs. Explo Freaks can also quickly
destroy any cover the player may have by spawn, acting as a more immediate threat.
Rhino Freaks will also push towards spawn, acting as a temporary wall between the player
and any Laser Crystals that may be firing their direction.
Loop Boss |
|
Hyper Crystal |
Loop will also add a boss for this area, being the Hyper Crystal.
It will always spawn during level generation, typically far away from where
the player would spawn.
Once the Hyper Crystal makes line of sight with the player it will initiate the fight,
breaking any nearby walls to give it more space to move around. It will not directly attack
the player itself (besides deadly contact damage), rather it will repeatedly spawn rings
of Laser Crystals which will continually circle around it while attacking the player.
If too many of its Laser Crystals are killed it will cause the rest alive to become detached from its circle
to roam around freely, and will then spawn a new ring of enemies.
If the player breaks line of sight with the Hyper Crystal, it may trigger a Laser Crystal or Lightning Crystal
nearest to the player to explode into lasers/lightning, which can also break walls removing some cover.
Spawn Rates
Loop spawn rates have a chance of replacing the normal spawn pool for every enemy spawn. This chance becomes more likely with every consecutive loop.
Frozen City
The Frozen City is the fifth area in the game and consists of three levels: 5-1, 5-2 and 5-3.
Typical level generation for the Frozen City includes many open areas with long branching hallways. There can include some semi-open areas with walls in various shape-like patterns, with some resembling giant letters.
Some of the level's flooring will be ice which the player will slide on if they ever stop moving, making precise positioning difficult.
Enemies |
||||
Snow Bandit
|
Snowbot |
Wolf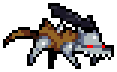 |
Snowtank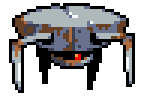 |
Gold Snowtank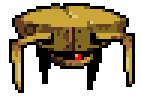
|
The most common enemy in the Frozen City are Snowbots, which will aggressively
charge if the player gets even relatively close, sliding around at a very fast speed.
Wolves are the next most common and will fire a spread of bullets if they have line of sight,
doing a roll forward while doing this attack.
Snowtanks are somewhat common spawns that will wander around harmlessly until having line of sight,
in which they will fire a rapid barrage of bullets. Their attack has a laser sight indication before
firing, similar to Snipers. When Snowtanks are killed they will explode.
Snowtanks have a small chance to be replaced by Gold Snowtanks on 5-2 and 5-3.
These enemies will lock onto the player and fire far more quickly, and in the center of their
bullet barrage they will also fire an explosive missile. They similarly
will explode when killed.
Snow Bandits are not typical spawns, but a few will always spawn around the Proto Statue on 5-2. They will also pop out of the Snowman prop.
Props |
|||||||
| Hydrant |
Street Light |
News Stand |
Icicle |
Soda Machine |
Snowman |
Frozen Car Wreck  |
Ice Flower |
Frozen City has many props, although most are harmless. Hydrants,
Street Lights, News Stands, Icicles and Soda Machines do not have any
special functions.
As mentioned above, the Snowman prop will break into three Snow Bandits
upon its destruction.
Frozen Car Wrecks mechanically work the exact same as Car Wrecks from
the Scrapyards.
If a Snowbot comes into contact with a Car Wreck, they will
automatically pick them up and throw them at the player if line of
sight is made, doing explosive damage upon contact.
A flying Car Wreck can be deflected with any player projectile
or melee, although this requires fast reaction time.
There is also an Ice Flower prop seen on 5-1 if a certain condition is fulfilled beforehand, and if interacted with enough it will bring the player to a secret area.
On 5-2 the Proto Statue prop will spawn, which is linked to a different secret area.
Boss |
Lil Hunter
|
The boss of this area is Lil Hunter, who spawns on 5-3.
At 7 seconds into the level (preloop) he will spawn at the opposite end
of the level from the player, and then he will fly into the air to their
location, initiating the fight.
When Lil Hunter flies he will always relocate at or near the players location, indicating where he will land with a shadow on the ground. When landing a burst of blue flames will spread around him, which behaves like normal flames.
Lil Hunter has two direct attacks.
When he has line of sight with the player, and they are far away enough,
he will rapidly fire streams of bullets in a fairly inaccurate manner.
If the player is too close to him instead, he will fire a wide spread
of bouncy bullets making close range dangerous.
If Lil Hunter does not have line of sight with the player he may also call in IDPD reinforcements to help attack. He can do this up to 6 times in the fight and summoning is based by his health lost, meaning that this is a limited attack.
Upon being killed Lil Hunter will explode then rapidly spiral around the level unpredictably, breaking any walls he comes in contact with while increasing in speed. At a random wall he will eventually stop in place for a moment, and then cause a large death explosion around him.
Loop Version: Lil Hunter will initiate the fight
with the player much sooner, starting twice as fast by Loop 2.
Both of his bullet attacks gain more bullets with each increasing loop,
and he will fire his bouncy bullet attack far more aggressively.
In loop his IDPD summoning attack can include Elite IDPD, with the pool
being replaced by Popo Freaks in Loop 3+.
His death explosion will also add more explosions for each loop, which makes its
damage radius progressively bigger.
Loop Enemies |
|||
Necromancer
|
Freak* |
Explo Guardian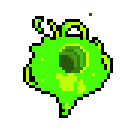
|
Dog Guardian
|
The possible loop spawn pool still has Snowbots being the most common enemy, but will swap the chances of Tanks and Wolves spawning to make Tanks more common.
Three new enemies are also added to the loop spawn pool, which are fairly common.
The first of these are Necromancers which by extension add Freaks to enemies encountered in the level, adding a lot more fodder the player has to deal with.
The other two enemies make a return from Palace. Explo Guardians will add a bunch more projectiles to the mix, while Dog Guardians will act as tanky walls between them and any other enemies.
In addition, Gold Snowtanks are far more likely to replace normal Snowtanks on 5-2 and 5-3 levels. They are guaranteed to replace normal Snowtanks by Loop 4 normally, or by Loop 3 with Crown of Blood. 5-1 will always have normal Snowtanks only.
Spawn Rates

Loop spawn rates have a chance of replacing the normal spawn pool for every enemy spawn. This chance becomes more likely with every consecutive loop.
Labs
The Labs are the sixth area in the game and is a transitional area consisting only of one level: 6-1.
Typical level generation for the Labs includes many long hallways, sometimes in maze-like structures.
There are some medium-sized areas where props usually spawn. As a transitional level
it is dark, meaning that visibility is limited.
Enemies |
||||
| Freak |
Explo Freak
|
Rhino Freak
|
Necromancer
|
Turret |
In preloop Labs there is a high chance that floor tiles spawn nothing, meaning that there may be large unoccupied areas. Labs may only have a few enemies, or the player may get swarmed entirely.
The most common enemy are Freaks which only deal contact damage, similar to Rats
these are low-health enemies but will try to swarm the player. They will remain stationary until
they make line of sight at least once, then will constantly be on the move.
Explo Freaks will always move towards the player's location but can get stuck behind walls.
They will try to run directly into the player and will explode upon contact or death,
which is particularly dangerous for a dark level.
Rhino Freaks similarly always try to walk towards the player but are much more slow moving and tanky,
and will deal high contact damage.
Necromancers have no way of harming the player directly. Rather their
mode of attack is a revive ability. If there are any corpses within their line
of sight they will summon a revive circle, which will turn any of these corpses
into Freaks regardless of what they were before. This can include destroyed props.
Necromancers will walk away from the player instead of towards, often hiding at the end of long
hallways.
There is also a small chance of Turrets spawning, which will randomly pop out of the ground but are unable to move in any way. They will fire a barrage of bullets at the player when having line of sight.
Props |
|||
Tube |
Mutant Tube |
Terminal |
Server |
Tubes, Terminals and Servers all are harmless props, with Terminals serving as a light source.
Mutant Tubes when destroyed will cause 8 Freaks to spill out of it.
Loop Enemies |
||
|
Big Rat
|
Green Rat* |
Laser Crystal |
The possible loop spawn pool makes enemy spawning very frequent compared to preloop.
Of these Rhino Freaks become very common enemies while Explo Freaks, Necromancers, Turrets,
Laser Crystals and Big Rats all share the same common spawnrate.
Freaks are not included in the loop spawn pool, meaning that they become increasingly
infrequent on the initial spawn with every passing loop, although they will quickly populate the level
due to the number of Necromancers.
Big Rats will continuously spew out Green Rats which will add to the volume of
enemies within the level, especially if Big Rats cluster up behind Technomancers for cover.
Laser Crystals will also spawn now which can serve as a nuisance as many other enemies will
aggressively approach the player, all the while having lasers shot at them.
Loop Boss |
Technomancer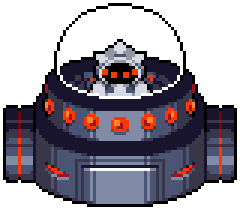
|
Loop will also add a boss for this area, being the Technomancer.
It will have outposts spread across the Labs level, and will stand in the one
nearest to the player during the boss battle.
The Technomancer cannot directly harm the player, rather it will revive corpses within their line of sight. Where Necromancers will revive enemies into Freaks, Technomancers will revive enemies into Necromancers, although it can only summon a certain amount at a time.
If the Technomancer cannot find any corpses to revive it may also summon a bunch of Turrets around it, although the amount of Turrets spawned are also limited at a time. (Condition needs verifying)
Once one of the Technomancer's outposts is destroyed it will move to the next closest one, and all must be destroyed in order to fully kill it. If the player moves onto another outpost then the Technomancer will move to that one, too.
Loop Scaling: The Technomancer will gain more outposts around the level,
and it will also summon more Turrets at a time. However, in both of these cases they are
limited by the size of the level, meaning that the outposts/turrets may still be less than what
their scaling calls for.
(Particularly noticeable for their outposts, Technomancers may only spawn 4-5 outposts a loop
even when a dozen should spawn.)
Spawn Rates
Loop spawn rates have a chance of replacing the normal spawn pool for every enemy spawn. This chance becomes more likely with every consecutive loop.
Palace
The Palace is the seventh area in the game and consists of three levels: 7-1, 7-2 and 7-3.
This is the final area of preloop, and the player will have the chance to either end the run,
or to continue via looping.
Typical level generation for the Palace includes very wide open areas, leaving little coverage for the player.
Enemies |
||
Guardian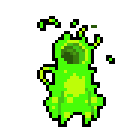
|
Explo Guardian
|
Dog Guardian
|
In preloop Palace there is a high chance that floor tiles spawn nothing, meaning that enemies may be much more spread apart. However, all three enemies are aggressive in nature, so most spawns will be chaotic in nature.
The most common enemy are Guardians which will fire slow moving orbs at the player.
They may also randomly decide to teleport to a random spot on the map when having line of sight.
Explo Guardians will hover towards the player and will charge up an attack, shooting out
very fast low-damage pellets. If they are killed while charging up their attack,
they will still fire pellets but at a much slower speed.
Dog Guardians are fairly common as well and will wander around the level until they notice the player,
in which they will randomly decide to jump with a high velocity. They are likely
to jump multiple times in a row, each doing high contact damage.
All Guardian enemy types will break walls when killed, and Explo/Dog Guardians can also
break walls with their attacks.
There is also a chance for IDPD to spawn in through portals at the level start in order to ambush the player. All of their mechanics can be read about below.
Props |
|
Small Generator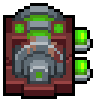 |
Nuclear Pillar |
On 7-1 and 7-2 there are two props, of which the Nuclear Pillar being harmless.
The Small Generator will cause a high damage explosion upon destruction which can harm both the player and
enemies,
and will drop a few rads.
7-3 Props |
|
| Throne Statue |
Big Generator
|
Level generation on 7-3 will always be the exact same regardless of loop. On both sides of the red carpet will be Throne Statues and Big Generators, which cannot be destroyed until the final boss fight begins.
Throne Statues will spawn a Palace Guardian when destroyed. It will also spawn more with each loop. It can be destroyed by the Throne's orb attacks, the Throne walking over it, other Guardians dying near it, or certain player projectiles such as large plasma balls. Most player projectiles have no effect.
There will always be four Big Generators.
Normal Game Ending: If not all four Generators are broken before the Throne is killed,
then the player will sit on the Throne, ending the game.
Run Continuation: If all four are destroyed before killing the Throne, then
a loop portal will spawn over the Throne's corpse, continuing the game. This must be repeated
in every loop to keep continuing the run.
Upon destroying all four generators, the Throne's current health will be cut in half.
Loop Generators will not affect the Throne's HP anymore. They will have less HP however,
taking a lot less time to destroy.
Boss |
The Nuclear Throne
|
The final boss of the game is the Nuclear Throne itself. It will stand dormant at the end of the 7-3 hallway, creaking awake if the player touches it. It will only fully wake up once it is damaged in any way. The fight will officially start after the Throne uses its initial laser beam attack.
The Throne has three different attacks.
The first of which is its laser beam, which it will charge up then fire if the player
is ever standing within its blast zone (the red carpet, unless if the Throne gets pushed to the side.)
The second attack is two tri-shot patterns of bullets, and will alternate
them more quickly when low on health.
Its third attack is shooting giant orbs which breaks into smaller orbs upon making contact or coming to a stop.
The Throne will always use the orb attack if the player stands too far to the sides, firing them
at a rapid pace if standing aside for too long.
If the player walks too far away from the Throne it will also walk downwards. It can also
deal often deadly contact damage.
Upon killing the Throne there will be repeated explosions across its body, ending with one final death explosion covering its entire area. The run will end there unless if all four Generators have been destroyed, in which the player shall loop.
Whether the run ends or loops, the player will unlock the current crown they are carrying if not unlocked yet. The loop portal will also uncurse any currently held weapons.
Loop Scaling: The Throne's tri-shot attack will fire more bullets in each row. Its giant orb attack will break into more rows of smaller orbs upon breaking, making dodging increasingly more difficult.
Loop Enemies |
||
| Sniper |
Jungle Bandit
|
Explo Freak
|
The possible loop spawn pool will make Explo Guardians and Dog Guardians the most common enemies. Normal Guardians are not in the loop spawn pool, making them increasingly less common with every loop. Depending on playstyle, the majority of Palace may be fought right by spawn due to enemy behavior.
Jungle Bandits are equally common now to spawn, with Explo Freaks
and Snipers being fairly common spawns.
Explo Freaks and Jungle Bandits are both aggressive enemies and will try
to put even more pressure on the player at spawn. Snipers will be particularly
annoying in this area as there will be many high HP enemies between them and the player,
as well as Palace usually being very open areas with little to no cover.
Spawn Rates
Loop spawn rates have a chance of replacing the normal spawn pool for every enemy spawn. This chance becomes more likely with every consecutive loop.
Campfire
The Campfire is accessed in loop only and is a transitional area consisting of only one level: 0-1.
This area will resemble the character selection screen at the start of the game, except
now every unpicked mutant will be found dead on the ground. (Y.V. and Horror do not leave corpses,
so they will not be present.)
Typical level generation for the Campfire is always one large open room. Unlike
other transitional areas, the Campfire is not a dark level.
Once the boss fight starts all the walls in the Campfire will disappear, leaving the
void in its place with a giant portal as the background. Any projectiles can be freely
shot into the void, but the player cannot walk into it. This means that once the
fight starts, the player's arena can no longer get any bigger.
Props |
||||||
Night Cactus  
|
Night Bone Pile |
|||||
Props in this area are variations of props seen in the Desert, both of which are harmless.
Campfire L1-L3 |
Campfire L2-L3 |
Campfire L4+ |
||||
Grunt |
Inspector
|
Shielder
|
Elite Grunt
|
Elite Inspector
|
Elite Shielder
|
Popo Freak
|
Immediately when entering the Campfire, the IDPD will ambush the player.
The number of IDPD portals that appear follow the formula of Portals = (Loop * 3) + 1.
Loop 1 will see 3 IDPD Portals, while Loop 2 will see 7 of them.
Full attack mechanics of IDPD can be found in the next section below.
Loop Boss |
Throne II |
Once all IDPD are killed, Throne II will spawn into the level. It has much less health than the first Throne boss, however it will circle the arena and is more difficult to hit, as it can also randomly reverse its direction.
Throne II similarly has three attacks it can choose from like the Throne.
The first attack is firing out giant orbs which breaks into smaller orbs. It will
always use this as its first attack during the fight.
The second attack is shooting out laser orbs that will shoot a constant stream
of packed bullets, doing low damage individually but are very dangerous to get caught in.
The third attack it can choose is shooting out smaller orbs in a star-like formation,
making standing very close dangerous.
Throne II can also deal high contact damage, although it is unlikely
it would ever directly run into the player based on its pathing.
Upon being killed Throne II will cause random explosions around it,
ending with one final giant death explosion.
Some of the death explosions far extend outside of Throne II's sprite,
meaning that standing anywhere close can be dangerous while it dies.
When it is fully dead a giant loop portal will appear in its spot, bringing the player
back to the Desert. (This loop portal cannot uncurse weapons.)
Misc/IDPD
Mechanics in this section will appear throughout almost every area in the game, with few exceptions. Rather than repeat them in every area section, they will all be listed here.
Misc. Enemies |
|||
Mimic |
Health Mimic |
Weapon Mimic |
Hostile Horror (Enemy Horror) 
|
Normal Mimics are enemies that can replace ammo chests in any area starting from 2-1. They will occasionally lick their lips while making a noise, indicating they are not a normal chest.
Health Mimics are enemies that very rarely replace health chests in any area starting from 2-1. They will occasionally giggle while mashing their teeth, indicating they are not a normal chest.
Weapon Mimics are enemies that can replace normal/cursed weapon chests, with a very small chance to replace giant weapon chests in Y.V.'s Crib. They will not replace big weapon chests. The odds of one appearing increases with every consecutive level that the same weapons are held during loading screens, starting with five levels. That means the earliest one can be seen is on 3-1, and the counter will reset when one is spawned. They will occasionally giggle while peeking out from the chest, indicating they are not a normal chest.
A quick indicator on if a chest is safe to open is that safe chests will have a little shine animation.
All Mimics can appear in any secret area, so long as there is
a relevant chest for them to replace.
The only level with eligible chests that they will not spawn in is 7-3.
Hostile Horror is an enemy that can only appear once in a run.
It will spawn if two rad canisters are skipped in a row, replacing the rad
canister in the following level.
It will repeatedly fire a rad beam at the player which can also erase
projectiles, making it extremely dangerous to face head-on.
Hostile Horror can spawn in almost every level in the game.
Exceptions include Pizza Sewers, 7-3, 0-1 and HQ3.
Any other area counts, even areas without rad canisters such as
Crown Vaults or Y.V.'s Crib.
During loop, Hostile Horror is eligible to spawn
in a cluster meaning multiple may be encountered at the same time.
Mimics will never spawn in clusters, although they
used to be able to in older versions of the game.
Preloop IDPD |
||
| Grunt |
Inspector
|
Shielder
|
The Inter-Dimensional Police Department (IDPD) are an enemy team that repeatedly attempts to stop the player
throughout the entire game.
They are on a different team than normal enemies, meaning that enemies and IDPD will damage each other
as well as the player, although both teams will only ever target the player. They will not take contact damage
from enemies.
Even in preloop IDPD are particularly dangerous as they have aggressive attacks and also
have their own abilities similar to mutants.
Grunts will constantly roll around similar to Fish, making them difficult to hit. They will repeatedly fire
bullets at the player.
Inspectors will use telekinesis similar to Eyes, pulling the player in and pushing projectiles away. Their main
attack is
firing heavy-hitting slugs at the player.
Shielders will shield themselves similar to Crystal, which will either erase projectiles or deflect them, where
deflected projectiles can damage the player.
They will shoot a barrage of bullets in a spread at any distance, so long as they have line of sight.
Grunts and Inspectors will also throw IDPD Grenades at the player randomly if they do not have line of sight,
which do much more damage than normal explosions. These explosions will not harm IDPD themselves, unless if it
is
deflected by player melee, in which it can harm all teams.
IDPD utilizes portal travel in order to attack the player midway through the level. During preloop they will
spawn
when opening and filling a Proto Statue, selecting a crown or starting a
run with one,
opening an IDPD Chest, or spawned during the Lil Hunter fight.
They also have a chance to spawn at the very start of 7-1 and 7-2. No IDPD will spawn on 7-3 under any
circumstance.
Loop IDPD |
Grunt |
Inspector
|
Shielder
|
Elite Grunt
|
Elite Inspector
|
Elite Shielder
|
Van |
IDPD will start spawning on every level in loop, and starting from loop Desert they will have a chance of being
elite.
The chances of becoming their elite variants are 20% during Loop 1, and 40% during Loop 2.
IDPD will spawn during levels when anywhere from 20% to 80% of the base enemies in the level have been cleared
out.
Vans will also spawn with the same 20% to 80% limit, but only after any IDPD have been killed.
During Loop 1, two IDPD portals will spawn at the same time, and then one Van afterward.
During Loop 2, two IDPD portals will spawn at the same time twice for four portals total, with
two Vans afterward.
IDPD and Vans will always spawn partway into any level except for Vaults, 7-3, HQ3 and Y.V.'s Crib. Vans will also
not spawn on 0-1.
Vans do deadly contact damage while moving and will unload IDPD units when they come to a stop. Once they stop moving they are no longer directly harmful, however they provide cover for IDPD to fire from behind, and will cause IDPD explosions upon destruction. Vans are linked to the final secret area in the game.
Elite IDPD are far more dangerous than their counterparts, with attacks that are far more deadly.
Elite Grunts can now infinitely roll like Fish's Throne Butt and will rapidly shoot bursts of bullets.
If they ever lose line of sight with the player they are likely to fire a fast-moving deadly missile, destroying
any cover.
Elite Inspectors have much stronger telekinesis like Eyes' Throne Butt and will melee swing for high damage.
Multiple Elite Inspectors
have a much stronger pull when next to each other. They will also fire grenades when out of line of sight,
similar to their Inspector counterparts.
Elite Shielders will teleport after they shield, similar to Crystal's Throne Butt, although they can go to any
location in the level.
They will rapidly fire plasma balls at the player which is very deadly to get caught in.
Loop 3+ IDPD |
|
|
Popo Freak
|
Van |
Starting from Loop 3 Desert, all IDPD will be permanently replaced with Popo Freaks.
These are mutated IDPD that now belong to the enemy team. They will fire a wide spread of bullets
and have a chance of dropping IDPD grenades upon death.
Unlike other IDPD they can also deal contact damage to the player, and after about 26 seconds they can revive
themselves
which has no limit. This makes them less of a direct threat than Elite IDPD are,
but also are far more persistent and punishing of weaker builds.
Vans will now immediately explode in Loop 3+ once they stop. As they remain on the IDPD team this will instantly
kill any Popo Freaks
inside (up to a certain point due to HP scaling), however these Popo Freaks can also respawn themselves after
time has passed.
Full mechanics of Popo Freaks and Vans are explained on the meta guides,
be aware this is for advanced play.