Secret Areas Overview
Page Contents
There are 8 secret areas in Nuclear Throne, which are all optional to visit during a run.
Five of these areas are linked to main areas they correspond with as an alternate route.
Most secret areas can be visited multiple times in a run including Oasis, Pizza, Mansion and Cursed Caves.
Multiple Jungle visits are dependent on RNG.
Crown Vaults can only be visited three times in a run, while IDPD HQ and Y.V.'s Crib are a one time visit.
The following page will go over each secret area including their entering mechanics, level generation, enemy
behaviors, props and spawnrates.
However much of this is only a summary from other pages. Please see the enemies
(WIP) and
props page for fully in-depth information.
Most secret area sections will also include 'Entering Strategies' which is subjective advice.
'Preloop' will refer to Loop 0 (start of the game), 'Loop' refers to Loops 1 & 2, while
'Meta Loops' refers to Loop 3+ for advanced runs.
Crown Vault Access
Proto Statues are props that lead to the Crown Vault. They spawn on 3-2 and 5-2 on preloop, and additionally 1-2
and 7-2 on loop.
Only 3 Crown Vaults in a run can be visited during a run, and will no longer spawn after which.
Weekly challenges will always spawn Crown Vaults in their broken state and cannot be used.
Summary: In order to enter the Crown Vault, the Proto Statue must be damaged until it enters its collecting phase. Once enough rads are collected it can be destroyed, opening the portal to enter the Crown Vault.
Full Explanation:
1. Idle Phase: Proto Statues spawn in at 120 HP in preloop. Once it falls under 70% HP, it will enter its collecting phase, being 83 HP in preloop.
2. Collecting Phase: Proto Statues will suck in any rads that are within its range, although any
rads
that come in contact with the player will be collected by them instead.
Once it is fed 24 rads it will become fully active and can then be destroyed, indicated by lighting up in the
middle.
It can still collect rads while full, to no benefit to the player.
3. Opening: Once the Proto Statue is fully activated and then destroyed, a green portal will
spawn giving
access to the Crown Vault.
If the level is exited without destroying the Proto Statue, then the secret area will not be entered.
Prop Mechanics:
Proto Statues are props that are considered on the enemy team, meaning that enemies cannot normally damage
it.
The exceptions to this is any enemy attack that harms all teams (such as explosions), as well as
any IDPD as they can harm enemies.
Two portals summoning IDPD units will spawn when the statue enters its collecting phase,
and two more when it enters its activated phase.
If a crown is selected in Crown Vault then one more IDPD portal will spawn at the start of the next level.
(Besides 7-3)
Proto Statues will always spawn four Bandits around them. In the Frozen City they will all transform into Snow Bandits instead.
Unlike other props, Proto Statues will gain more HP per loop, being +12 HP each loop:
| Loop: | L0 | L1 | L2 | L3 |
| Full HP: | 120 HP | 132 HP | 144 HP | 156 HP |
| Collecting Phase: |
83 HP | 92 HP | 100 HP | 109 HP |
If wanting the exact HP for later loops use the formula of 120 + (Loop * 12).
Entering Strategies:
Preloop 3-2: Entering the first Crown Vault can be extremely annoying dependent on
generation.
Proto Statues can sometimes spawn in a corner with very few enemies around, so by the time the player finds
it
there may no longer be enough rads on the level.
The best way to ensure entry is to rush by any enemies to the Proto Statue and opening it as quickly as
possible,
although taking damage is very likely. For some generations it's just not worth visiting the first Crown
Vault at all.
If there are not enough enemies to fill the Proto Statue immediately, then some enemies can be pushed or
lured closer
until they are within range, only killing them afterward. Bandits, Ravens and Snipers all will not attack
at point-blank range.
Preloop 5-2: Filling Proto Statues is far more generous here given typical enemy generation
and layouts.
Snow Bandits only naturally generate around Proto Statues, so if one is seen that's an immediate indicator
on the Statues direction.
Similar to the 3-2 tips if there happens to not be enough rads, enemies from further away can be lured near
the Proto Statue
only killing them when they are within its range. Exercise caution with luring Snowbots as they can be
unpredictable.
Loop: Filling Proto Statues on any level in loop is straightforward given the high volume of
enemies
that spawn in every level.
Until the Proto Statue's location in a level is known and if running any weapon that deals very high damage
(Plasma Cannon, Super Bazooka, etc)
be careful of shooting them blindly off-screen as they can easily destroy Proto Statues in one shot.
Crown Vaults
Crown Vaults are a secret area that can be entered through multiple different main areas, as such their pause menu location is always labeled '???'. Completing the Crown Vault will simply bring the player to the next X-3 area.
Typical level generation includes one large open area with multiple long branching hallways. Similar to transitional areas, the Vault is a dark level and has limited visibility.
In the middle of the open area a crown pedestal will always spawn. If it is walked directly over it will end the level, or if there are Crown Guardians present via Vault Statues this will cause them to activate.
Upon completing the level it will give an option of 6 crowns, the selection will depend on if visited in preloop or in any loop. Bare Head is always an option to go crownless.
If any Vault Statue is destroyed before walking over the
crown pedestal, then no crown selection will be granted at all.
This can be used to circumvent having to select a new crown, such as
wanting to keep a preloop crown during loop.
Enemies |
Crown Guardian
|
Crown Guardians are a much more aggressive version than
Guardians seen in the Palace. They will fire giant orbs which do
high amounts of damage and also breaks into smaller ones.
They can also teleport even if they do not have line of sight with the player,
making them very dangerous if not killed immediately.
Props |
Pickups |
|
| Torch |
Vault Statue |
Proto Chest |
There are two props in this area, one being the Torch which simply serves as a light source and is harmless. The other is Vault Statues, each summoning one Vault Guardian.
The first Crown Vault will have no Vault Statues, or two if a run
has been started with any crown.
The second Crown Vault visit will always include two Vault Statues, while
the third visit will always include four.
Unlike other areas, the Crown Vault will not include any
chests or rad canisters, with the exception of the unique Proto Chest.
This allows for any weapon to be stored between runs.
The Proto Chest will only appear if any crown is currently being run.
Oasis Access
The Oasis is a secret area that can be entered through any Desert level.
The first step is opening all the chests in the level without killing too many enemies. Chests typically include
an ammo chest, a weapon chest and a rad canister.
Once all are opened Big Bandit will spawn. The second step is to kill him in under 10 seconds.
If Big Bandit is killed in time all enemies will instantly die and a portal to Oasis will spawn. Only one Big
Bandit needs to be killed in loop.
If Big Bandit is not killed in time then completing the current level will simply bring the player to 2-1
regardless of where he was summoned.
Big Bandit for Oasis will not spawn if 2% of enemies on 1-1 or 1-2 are killed before opening all the chests, or
10% of enemies on 1-3.
The percentage requirement does not include enemies spawned partway into the level.
A summary is that there is almost always a 3 enemy leeway due to how generation works, plus any IDPD that
spawned.
Cluster spawns in loop are also not a part of the initial enemy count, giving more leeway for Oasis viability in
loop.
Oasis Viability Explained:
Note that this explanation is niche, and is not required to know for Oasis access.
The percentage of enemies for Oasis viability is based on the initial enemy count.
If the number of enemies falls below 98% of the initial enemy count, then Oasis is no longer viable.
However, any enemies that spawn after the initial enemy count puts the total enemy count over 100%.
Both chests and rad canister spawn with a Bandit to guard them. Interestingly, these 3 enemies do
not count towards the initial enemy count.
This means that the number of enemies in the level starts above 100%, giving at least 3 enemies of leeway
from the getgo.
Any IDPD or cluster spawns also do not count towards the initial spawn, giving even more leeway.
Example: On 1-1 in preloop there could be 12 enemies in the initial generation, along with 3 Bandits guarding
each chest for 15 enemies total.
The run also starts with a crown adding 2 IDPD, bringing the total to 17 enemies.
Any 5 enemies may be killed, so long as the alive enemy count does not fall below 12.

Big Skulls are props that have a chance to spawn on Desert levels. If their mouth is open it is an indicator
that Oasis can still be entered. If their mouth is shut than Oasis can no longer be spawned on that level.
(The prop itself is not required for Oasis entry.)
Entering Strategies:
Preloop: Triggering Oasis is fairly easy for preloop, especially as failed attempts
can simply restart the run.
Make way to both chests and rad canister while not firing at all, and avoiding damage where possible.
Big Bandit must be killed in under 10 seconds to get to Oasis, which is possible even with a basic Revolver.
(100 HP would take 34 shots which takes about 7 seconds with reload speed.)
Loop: Oasis becomes difficult to trigger in loop as the player cannot simply avoid firing at
enemies at all,
and is generally not worth the effort to enter.
If wanting to enter one consistent way would be to bring an Ultra Crossbow and dig around the outskirts of
the level,
only re-entering the main level to quickly collect chests before diving back into cover.
Meta Loops: Similarly Oasis is not worth the effort of entering on purpose, and is often
avoided by
meta players as some leaderboards ban repeated Oasis usage as it skips two of the harder boss fights (Big
Bandits and Mom).
Similar to loop if really wanting to enter, Ultra Crossbow can be used for consistent entry.
It is actually possible to enter Oasis on accident in later loops in certain circumstances.
Accidental entry only occurs if both chests happen to be near spawn, with the radiation canister being
nearby too or destroyed off-screen.
The other factor is if the player is mostly/only clearing the level with Ultra Shovel, avoiding SPC usage,
as Ultra Shovel will only kill a minimal amount of enemies before reaching the chests.
(The reason this works is that keeping 98% of enemies alive is an extremely high threshold to maintain
normally,
but cluster enemies do not count towards the initial calculation meaning that the enemy count is
well above 100% of the initial count.)
The Oasis
The Oasis is a secret shortcut area consisting of one level: 1-?. Completing Oasis will let the player skip to 3-3.
Typical level generation is similar to the Desert, being wide open areas with branching side rooms.
As it is located underwater, the Oasis will cause the game to behave differently in a few ways:
- Any characters that cannot breath underwater will have an air bubble around them, does not effect actual gameplay.
- Fish and Robot will not have air bubbles around them.
- Any enemies that cannot breath underwater will have air bubbles as well.
- Lightning will cause electrocution in the water. This deals 2 damage to anything on-screen, including the player.
- Flames will immediately be extinguished and become bubbles, causing no damage.
- Flamethrower and Dragon are completely useless in this area.
- Flare Gun, Flame Cannon and Flame Shotguns will have their main projectile, but no flames will spawn from them.
- Most sound effects will sound submerged while in the Oasis.
- Notably the spawning portal for IDPD and Van spawns will be heavily submerged, making them very difficult to hear.
All of these effects apply on the Desert level as well the moment that the Oasis portal is activated.
Enemies |
||
Bandit x 3 |
Bonefish
|
Crab |
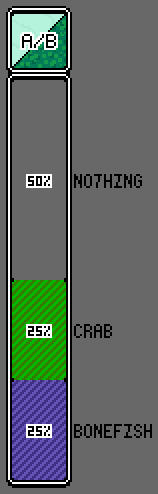
There are just two common areas in this area which both have an equal chance of spawning. Bonefish will try to deal contact damage to the player, while Crabs will fire barrages of pellets. Both enemies will aggressively approach the player to attack.
One Bandit for each chest will also spawn, meaning that 3 will normally be seen in an Oasis visit. (Or five with Open Mind.)
Props |
Pickups |
|||
Oasis Barrel |
Water Plant |
Anchor |
Water Mine |
Clam Chest |
All props in the Oasis are harmless with the exception of the Water Mine, which will deal explosive damage and also fire bullets in all directions, making it more dangerous than Barrels.
The Weapon Chest in this area will be replaced with a Clam Chest, which behaves exactly the same.
Spawn Rates
Pizza Sewers Access
 |
Pizza Sewers is a secret area that can be entered through the Sewers.
The manhole can be found randomly in the Sewers on the grey flooring only. If any explosion makes contact with
the manhole it
will instantly open up a portal leading to the Pizza Sewers, causing all remaining enemies in the level to
instantly die.
Any explosive weapon can open the manhole provided that the projectile
can also harm the player.
Other explosions that count include Toxic Barrels, IDPD grenades/rockets, Van explosions, and Rogue's
active/passive abilities.
Sources that do not harm the player also cannot open the manhole, such as flame weapons or blood explosions.
During loop, Pizza Sewers can only be opened after Mom is defeated. Finding the manhole can sometimes be difficult due to the amount of enemy corpses.
Update 99 Bug: Manholes can commonly spawn underneath chests and rad canisters, making it easy to miss to the untrained eye. This is changed on update 100 so it typically spawns on an open tile.
In some very rare cases the manhole will fail to spawn at all, making Pizza Sewers impossible for that level.
Entering Strategies:
Preloop: If a Grenade Launcher drops in the Desert it can be carried to Sewers for Pizza
access,
as it is a weapon that has good damage very early on.
Make sure to check every corner if the manhole cannot be located, especially underneath chests on pre-u100
versions.
Loop: Carrying an explosive weapon into Sewers specifically for Pizza access is not
worth dropping
good weapons for, though characters like Eyes and Chicken can use their active abilities to pull/throw extra
weapons into the exit portal.
Pizza can only be entered once Mom is killed, so the manhole may be difficult to locate due to the volume of
corpses on the floor.
To locate the manhole walk around the main parts of the level (not any destroyed wall terrain), keeping a
close eye on the flooring.
If worse comes to worse, shooting explosives at any grey flooring covered with corpses will cause Pizza to
be opened eventually.
Meta Loops: If no explosive weapons have dropped, some enemies can be kept alive purposefully in a corner to repeatedly cause Popo Freaks to keep respawning. If they drop grenades on death, Ultra Shovel can be used to knock them towards the manhole. (Or if the manhole position is unknown, knocking them towards different spots in the level each time.)
If all the walls around the manhole are destroyed before the Mom fight is over, then
opening the manhole may be difficult if the only weapons are a Bazooka or Nuke Launcher.
In these cases an enemy can be baited nearby in order to hit them at a strategic location.
If the only weapon is a Hyper Launcher they actually have a limited range, just far more off-screen
than the player can see. Simply walk in a straight line away from the manhole while repeatedly firing at it,
and eventually it'll open the manhole.
Pizza Sewers
Pizza Sewers is an extra secret area consisting of one level: 2-?. Completing it will bring the player to 3-1.
Level generation is similar to the Sewers, while being far smaller in size. It mostly only consists of long hallways with some semi-open areas, and is a dark level giving limited visibility.
Enemies |
|
Rat x 1 |
Turtle x 4 |
Pizza Sewers will always have preset enemy spawns, being 1 Rat and 4 Turtles. This is a reference to Teenage Mutant Ninja Turtles (TMNT).
Turtles will stand stationary but will randomly charge around in a spin, directing themselves at the player if they have line of sight.
Unlike other areas, Pizza Sewers does not gain additional enemies
upon looping. There will always only be 5 enemies.
During loop universal enemies will still spawn including IDPD, Vans and Mimics.
Hostile Horror will not spawn in Pizza Sewers.
Props |
Pickups |
Pizza Box |
Pizza Slice |
There is only one prop in this area, a Pizza Box which has a decent chance to drop health pickups in the form of Pizza Slices.
Y.V.'s Mansion Access
 |
 |
Y.V.'s Mansion is a secret area that can be entered through the first Scrapyards level, 3-1.
The Venus Car Wreck prop will spawn on this level, and is different from any other car props.
Using any of the 'Screwdriver' weapons on this will fix it, and
interacting with this (pickup/use button) will open a portal leading to Y.V.'s Mansion,
causing all remaining enemies in the level to die instantly.
The Venus Car Wreck spawns in with 25 HP, and there is no way to enter if it is destroyed.
Fixing the car will always set it to 47 HP, minus the damage taken from the Screwdriver.
(Energy Screwdriver with Laser Brain does 44 damage, meaning that the car will be set to 3 HP and is still
usable.)
Entering Strategies:
Preloop: The basic Screwdriver can be carried to Scrapyards to ensure entrance, although
this weapon is
on the weaker side at this point.
Once the Car Wreck is located be sure not to kill any Snipers next to it, as they can easily blow it up.
After the Screwdriver is used on the Car Wreck, it does not have to be immediately entered, meaning
that
the Screwdriver can be swapped for any weapon found on 3-1 before entering the Mansion.
Loop: Entering Mansion on Loop is unlikely as the Car Wreck has very low HP and is easily
blown up by
any player projectile or multiple explosions within its proximity.
If any Screwdriver happens to drop (or one is brought to a previous level as Chicken/Eyes), try to clear out
the level
slowly to not blow it up from a distance. Any sort of weapon that has range could break it on accident if
wishing to enter.
Meta Loops: Due to the low HP of the Car Wreck, entering Mansion is very unlikely
in any later loop.
Aside from Screwdriver drops being up to chance, the Car Wreck would preferably need to be around a corner
that it won't get
accidentally damaged in.
The safest way would be clearing the level with only Ultra Shovel, and being extra careful not to set off
any Snipers near the Car Wreck at all.
IDPD and Vans will complicate this greatly due to their large damage radius. Backing up towards spawn once
they start to spawn in is the best methodical approach.
Y.V.'s Mansion
Y.V.'s Mansion is a secret area consisting of one level: 3-?. Exiting the area will bring the player to 3-3.
Typical level generation consists of multiple semi-open or fully open areas, with occasional hallways branching off.
Enemies |
|||||
| Bandit x 3 |
Molefish
|
Molesarge
|
Fireballer
|
Super Fireballer
|
Jock |
The most common enemies in this area includes Molefish and Molesarge which are moderately
dangerous in close range, but are otherwise easily handled.
Fireballers are also somewhat common with Super Fireballers being a rare spawn, both are difficult
to approach in any open area as they will repeatedly shoot out projectiles.
Jocks are semi-common but are easily the most dangerous enemy in the area, they will fire missiles
at the player when having line of sight and can easily destroy any cover allowing them to fire even more.
However they only have limited ammo and will try to simply do contact damage after running out, making them
more of a temporary threat.
Bandits will spawn in this area guarding the chests and rad canister, meaning only 3 will be seen. (Or 5 with Open Mind).
Props |
Pickups |
||
Gold Barrel |
Money Pile |
Y.V. Statue |
Gold Chest |
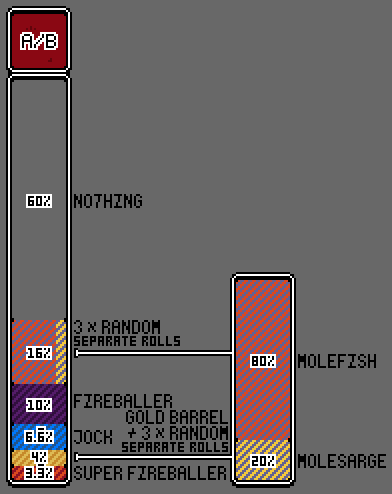
Gold Barrels will function the same as normal Barrels from the Desert, causing explosive damage. They will spawn 3 enemies similar to normal Barrels, but instead of Bandits they will spawn 3 enemies that can be either Molefish or Molesarge.
The other two props, Money Pile and Y.V. Statue, are harmless.
Weapon Chests will always be replaced with Gold Chests in this area.
These will only give golden weapons, which are permanently unlocked
if the weapon is carried through an exit portal. Each character can only have
one golden weapon unlocked at a time, getting a new one will overwrite the old one.
Preloop Gold Chests: Golden variants of the Machinegun, Shotgun,
Crossbow, Grenade Launcher, Laser Pistol and Wrench.
Loop Gold Chests: All 6 preloop variants as well as golden variants of the Assault Rifle,
Slugger, Splinter Gun, Bazooka, Plasma Gun and Screwdriver.
Spawn Rates
Cursed Crystal Caves Access
 |
Cursed Crystal Caves (CCC) is a secret area that will replace the normal Crystal Caves.
Entrance to it simply requires entering 4-1 while running any cursed weapon.
Cursed Crystal Caves will still occur if Last Wish is taken after exiting 3-3, even though weapons will be uncursed when spawning into the level.
Entering Strategies:
Preloop: Entering CCC is very straightforward as all it needs is a cursed weapon, just taking one whenever one appears. If no crown is unlocked yet, or on a daily, then take Crown of Curses from the 3-2 Vault for the 2/3rds chance of one appearing on 3-3.
Loop: Cursed weapons can be more of a burden in loop as all Vaults are likely visited at that point, so unless if a cursed weapon is really good it's best to avoid CCC due to its difficulty. Whatever weapon is brought into CCC may have to be ran until the end of that loop to uncurse, unless if a better alternative happens to appear.
Meta Loops: As CCC requires a cursed weapon to enter it is rarely done by deeploopers, not
to mention
the danger the area poses.
If a cursed chest appears then at the end of the level Ultra Shovel and SPC can be temporarily swapped to
other weapons so they are re-added to the
drop pool while opening the chest. If either appears in the cursed chest, it can be picked up in their
place.
Be aware that cursed SPC will prevent hotswapping in most situations, so some players may just opt to check
for cursed Ultra Shovels only.
The loop portal on 7-3 will uncurse weapons, however this can be circumvented if any other cursed
weapon
spawns on 7-3. After killing the Throne, simply swap out the cursed Ultra Shovel/SPC out with the cursed
weapon before entering
the loop portal, and then picking it back up on 0-1. This can help CCC happen multiple loops in a row,
however unlikely.
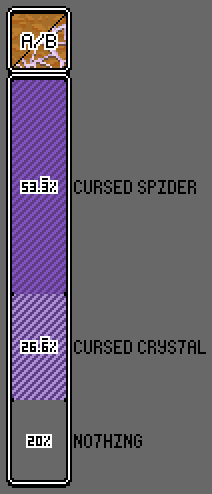
Cursed Crystal Caves
The Cursed Crystal Caves is a secret area that replaces the normal Crystal Caves, with the level being 4-?.
Level generation is extremely similar to the Caves, being wide open areas with some branching hallways. There is also a chance for large portions of the level to be completely covered in cobweb flooring, slowing the player.
Enemies |
||
| Bandit x 3 |
Cursed Spider
|
Cursed Laser Crystal |
Enemies in this level are more dangerous counterparts to normal Cave enemies.
Cursed Spiders are the most common and will behave the same as normal Spiders, scurrying towards the player if getting too close. Uniquely though every one has a chance to split into two more Cursed Spiders upon dying, which can happen any number of times.
Cursed Laser Crystals are very common and will fire lasers similar to normal Laser Crystals,
and also do lethal contact damage.
They will also teleport randomly to any nearby location provided no walls are blocking them.
They can teleport while firing their lasers, and can also teleport directly on top of the player
and do lethal damage instantly.
This makes them one of the most dangerous enemies in the game to deal with.
Bandits will spawn in this area guarding the chests and rad canister, meaning only 3 will be seen. (Or 5 with Open Mind).
Props |
Pickups |
| Cursed Crystal |
Cursed Big Weapon Chest
|
There are two harmless crystal props in this area with no special function.
The Weapon Chest in this area will always be replaced with a Cursed Big Weapon Chest. These contain 3 cursed weapon and can pull from up to 3 weapon pools higher than the current stage, while normal Cursed Chests can normally only pull from up to 2.
Loop Boss |
Loop Enemy |
|
Hyper Crystal |
Lightning Crystal |
The Cursed Crystal Caves will not have any new enemy variants naturally spawning during loop, with the exception of Hyper Crystal.
The Hyper Crystal is the same boss as seen in the normal Crystal Caves,
although it will spawn different enemies in its ring.
It mainly spawns Cursed Laser Crystals in its ring which can still teleport around, but they will
be pulled back into the ring unless if the Hyper Crystal detaches them.
Lightning Crystal have a chance to spawn within its ring too, which do not spawn in the secret area
otherwise.
There is also an extremely small chance that a Cursed Spider will spawn from Hyper Crystal as well.
Spawn Rates
Jungle Access
 |
The Jungle is a secret area that can be entered through the first Frozen City level, 5-1.
If the Last Wish mutation is taken it will cause the Ice Flower prop to
spawn on 5-1.
If the flower is interacted with (pickup/use button) it can be fed 1 HP. If this is done four times then the
Jungle will be
entered, causing all remaining enemies in the level to die instantly.
If the player feeds the flower with only 1 HP left they will die, even if it's the last HP needed to enter.
Strong Spirit will count as feeding it 1 HP.
Melting at 1 max HP cannot enter Jungle. Chicken can feed the flower even while headless.
Entering the Jungle will cause the Last Wish mutation to be consumed and it will grant a new mutation set in its
place,
functioning as a delayed reroll.
Last Wish will be re-added to the mutation pool meaning it can be taken multiple times in a run, allowing for
multiple Jungle visits.
Entering Strategies:
Preloop: Entering the Jungle at lower health is common due to its requirement, although
this will put the player into immediate danger.
A good strategy to avoid low HP is to find the Ice Flower as soon as possible and to feed it only 3
HP,
and then carefully completing the rest of the level to get additional health drops before entering.
(Be careful of entirely completing the level before entering, as the normal exit portal can break the Ice
Flower if close enough
or block the player from reaching it.)
Loop: Trying to rush into the Ice Flower can be very dangerous here due to how many enemies
spawn in loop.
The Ice Flower is a prop on the enemy team, meaning it will only take damage from any player or IDPD attack,
or enemy attacks that can harm themselves (like explosions).
Thus, due to its high HP the safest measure is to wait until most or all enemies in the immediate proximity
are killed before trying to enter.
Meta Loops: While the Ice Flower has a high amount of HP, it can easily be destroyed by any direct SPC shot. The safest way to guarantee Jungle access is to clear the level with Ultra Shovel mainly, only using SPC when it's clear any of the main plasma ball is unlikely to reach the Ice Flower.
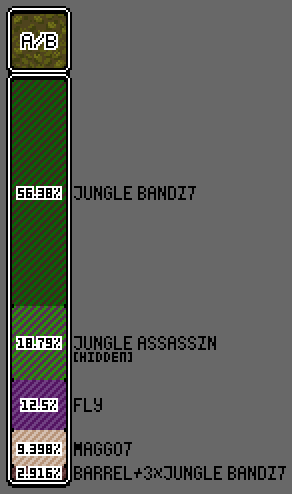
Jungle
The Jungle is a secret area consisting of one level: 5-?. Exiting the area will bring the player to 5-3.
Typical level generation includes very open areas, with some branching hallways.
Enemies |
||||
| Bandit x 3 |
Jungle Bandit
|
Jungle Assassin
|
Jungle Fly |
Maggot |
The most common enemy are Jungle Bandits which are a more aggressive version of regular Bandits.
They will fire a constantly stream of bullets similar to the Pop Gun.
Jungle Assassins are fairly common and will blend in with any surrounding bushes, making them
much harder to detect than normal Assassins, although they will also occasionally peek out from their
hiding place.
Jungle Flies are somewhat common and will aggressively approach the player while doing higher contact damage.
They can also spew out multiple Maggots acting as projectiles, and then as enemies after they hit anything.
Maggots on their own also have a chance to spawn naturally.
Bandits will spawn in this area guarding the chests and rad canister, meaning only 3 will be seen. (Or 5 with Open Mind).
Props |
||
Barrel |
Bush |
Big Flower |
Bushes and Big Flowers are both harmless props in this area, with no special function.
Barrels will spawn in this area similar to the Desert, but instead they will spawn with 3 Jungle Bandits camping
around them.
Spawn Rates
IDPD HQ Access

IDPD HQ is a secret area that can only be visited in loop.
In Loops 1 and 2 Vans will start spawning and do 20 contact damage while moving. Once the Van comes to a stop and unloads IDPD units, there is a very brief window in which it can be walked over and interacted with (pickup/use button). This will automatically enter the IDPD HQ, causing all remaning enemies in the level to die instantly.
IDPD HQ can only be entered once during a run. The first two levels, HQ1 and HQ2, also spawn Vans meaning that IDPD HQ can be exited that way. There is no way to leave HQ3. If the player tries to enter IDPD HQ a second time in a run it will cause the Van to instantly explode instead.
If IDPD HQ is exited it will typically bring the player back to the next normal level. However this varies based on the area entered in, as well as the version, as outlined on the difficulty page.
IDPD HQ cannot be entered in any levels lacking Vans, such as 7-3, 0-1 and Y.V.'s Crib. Starting in Loop 3 Vans will start to explode, meaning that only Loops 1 and 2 have HQ access.
Entering Strategies:
Vans will spawn when 20% to 80% of enemies in the level has been killed, which can be difficult to predict. However the other requirement is that least one IDPD unit must have been killed, meaning that if both IDPD portals (during Loop 1) spawn in a corner they can purposefully be ignored while the rest of the level is completed, allowing for a more safe and predictable Van spawn. (Not suggested if Elite IDPD are in the mix.)
Van contact damage can instantly kill the player, making them intimidating to try to enter.
They will always move left or right horizontally depending on which direction the player is in,
meaning that it's easy to predict where they will end up.
Once a Van starts to spawn, start walking in the opposite direction until its spawning portal is barely on
the screen.
(Stand closer if there are mostly walls in the Vans way, as it will not travel as far.)
Try to stand near the center of the Van when it comes from the stop, preferably from the bottom side as its
hitbox for entry is more generous than the top side.
The moment the Van stops and IDPD pours out, walk directly over the Van while spam pressing the interact
button.
Entering the Van the first time may take a few attempts, but if this window is missed then simply retry
entering on the next level instead.
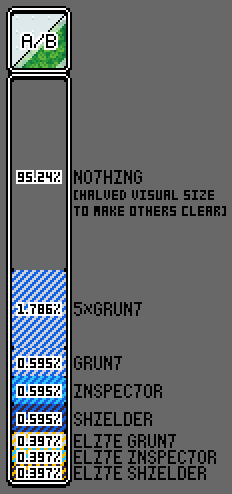
IDPD HQ
IDPD HQ is a secret area that can be entered through multiple different areas, as such their area is always labeled 'HQ1', 'HQ2' and 'HQ3'.
Level generation will typically have semi-open or fully open areas, with many branching hallways. HQ actually has seeeded layouts. There are still a few factors that can change layout (most notably, different versions have different layouts), other factors are not well documented.
Similar to 7-3, HQ3 will always have the same preset layout.
| Enemies | |||||||
Grunt |
Inspector
|
Shielder
|
Elite Grunt
|
Elite Inspector
|
Elite Shielder
|
Van |
|
Unlike any other area, IDPD will naturally spawn in HQ by default. This means that they're eligible to spawn in as clusters just like normal enemies are. Loop 1 has clusters of 5 enemies, while Loop 2 has clusters of 6 enemies (including the base enemy).
For the natural spawns, Grunts are by far the most common enemy and can spawn in groups by default. Inspectors and Shielders are somewhat common as well, while any elite IDPD variant are less common natural spawns.
IDPD and Vans will still spawn partway through the level and follow their typical spawning logic that they do in every other level. Full IDPD attack mechanics can be found on the main areas page.
Props |
| Plant Pot |
The only prop found in this area are harmless potted plants.
Final Boss |
Captain |
Captain serves as the true final boss at the end of HQ3. Beating her will similarly end the game as beating The Nuclear Throne does, and will give a different victory screen.
At the start of HQ3, Captain will sit at her desk waiting for the player to attack first. Once they do she will charge at them, and the fight will begin.
Captain will choose between one of three attacks, and may also randomly
teleport around the map.
Her first attack is her charge, which does high damage and has a very short
windup, making standing very close to her dangerous.
Her second attack is shooting out giant orbs which does even more damage than her charge.
If the orbs hit anything they will break into normal IDPD bullets.
Her third attack is firing out normal IDPD bullets in two different patterns, both needing
to be dodged in different ways.
Once Captain is defeated she will sit stationary and no longer attack. Firing at her
to fully kill her, or she will die on her own after a few seconds.
The game will then force the player to walk over to Captain's chair, ending the game.
Update 99 Bug: If there are any walls in the way of the player and Captain's chair, they will infinitely walk against the wall causing a softlock. This is fixed on update 100.
Spawn Rates
Y.V.'s Crib Access
Y.V.'s Crib is a secret area that is accessible to YV and Cuz only. It is guaranteed to be visited immediately upon taking any of their ultra mutations.
Upon exiting Crib, the player will typically be brought to the next normal level. However this can be inconsistent based on the area Crib was entered from, as well as version. (Full guide coming soon!)
Y.V.'s Crib can only be visited once a run, as it is an extra boost to their ultra mutations.
Y.V.'s Crib
As Crib can be accessed from multiple different main areas, the area is always labeled '$$$'.
Level generation consists of a spawnpoint usually in the middle, with chests at the bottom and the exit at the top.
Y.V.'s Crib has no naturally spawning enemies, with no IDPD or Mimics spawning here either. The only possible enemy to encounter is Hostile Horror, or the secret boss.
Props |
||||
| Venus Car Fixed |
Venuz Car 2 |
Money Pile |
Venuz Couch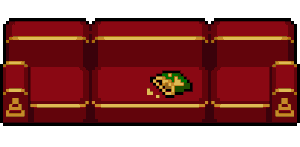 |
Venuz TV |
The top section of the level will have various Venuz Cars, any of which
can be interacted with in order to exit the level.
They will both explode upon destruction, with Venuz Car 2 having twice
as many of explosions covering a larger radius.
The bottom area will have the Venuz Couch which is essentially invulnerable.
Playing as Y.V. will have Cuz be on the couch, and will respond to Y.V. if the airhorn button is used.
Playing as Cuz will have Y.V. be on the couch, and will respond to Cuz if the bell button is used.
There is also a giant Venuz TV that has a ton of health, but is harmless.
Destroying the TV as Y.V. will cause Cuz to cry until the level is exited.
Destroying the TV as Cuz will cause Y.V. to attack, initiating a secret boss fight.
Pickups |
|||
Giant Weapon Chest |
Giant Ammo Chest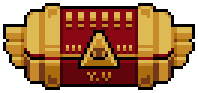 |
||
There are two Giant Weapon Chests in the level, or four with Open Mind. These each drop 24 weapons from up to 5 drop pools ahead of the current area, meaning that if ultra is reached on 7-2 or later it will include a full possible drop pool.
If Crown of Love is being ran then the chests will be replaced with Giant Ammo Chests instead, giving 24 ammo pickups each, which is far more than necessary to refill Y.V. or Cuz's current weapons.
Secret Boss |
| Gun God (Yung Venuz)  |
This is a boss fight that can only be fought by Cuz. Upon breaking the TV, Y.V. will immediately attack as the Gun God. He has four possible attack phases, and will always open the fight with his Revolver attack.
Golden Revolver: Fires four times in a row, and then will pop it for the fifth spread shot.
Golden Minigun: Fires a constant stream of bullets for a few seconds while slowly turning.
Golden Bazooka: Pops out four missiles at a time if the player is hiding behind any cover, even off-screen.
Golden Shotgun: Pops out a ton of shells at once if the player is standing too close.
Loop Scaling: Golden Revolver, Minigun and Shotgun attack all gets more bullets/pellets before switching attacks. Golden Bazooka remains unchanged.
If the Gun God is defeated then money will burst everywhere, as he drops three golden weapons. Y.V.'s C-Skin will be unlocked if not already.
Defeating the Gun God in preloop can drop golden variants of the Machinegun, Shotgun, Crossbow, Grenade Launcher, Laser Pistol and Wrench.
Defeating the Gun God in loop can additionally include golden variants of the Assault Rifle, Slugger, Splinter Gun, Bazooka, Plasma Gun and Screwdriver.
(Preloop condition may need further verifying)