Radstarving Overview
This page will reference tech used on the Destiny page and Daily Sheet page for Destiny-related mechanics with this page serving more as a strategy guide. As a light suggestion this guide is best utilized for runs going at least L2+, as radstarving would take up a significant chunk of time for runs that are ending by L1.
For vanilla runs, Crown of Destiny can be strategically taken on Non-Beta as it's very easy to predict what mutations are gained by looking at the set, while on Betas this is essentially random. For this reason Non-Beta is better for blind vanilla runs.
As for dailies any version can always be planned out if another person has scouted ahead. Otherwise it's virtually the same as vanilla.
If Crown of Destiny is being played blindly, statistically taking Destiny at lower levels will have more 'desired' mutations in the mutation pool, however there will also be less leeway for rad collecting before leveling up.
With this in mind there are three options that the player could do to radstarve;
- Start a run with Destiny (non-dailies) and starve until the 3-2 vault, only seeing 1 or 2 mutations and resetting if any bad ones are rolled.
- This is a part of the advanced meta guide for setgrinding and is not covered here.
- Starve from the 3-2 vault until the 5-2 vault, which is by far most commonly done for daily challenges.
- Starve from the 5-2 vault until the 1-2 L1 vault, which is far more risky and time consuming. Typically only done if it gets a perfect set on a daily.
As a reminder, here is every threshold to level up.
| Level: | Lvl. 1 | Lvl. 2 | Lvl. 3 | Lvl. 4 | Lvl. 5 | Lvl. 6 | Lvl. 7 | Lvl. 8 | Lvl. 9 | Ultra | Full Ultra |
| Rads needed: | 0 Rads | 61 Rads | 120 Rads | 180 Rads | 240 Rads | 300 Rads | 360 Rads | 420 Rads | 480 Rads | 540 Rads | 600 Rads |
| Total Rads: | 0 Rads | 61 Rads | 181 Rads | 361 Rads | 601 Rads | 901 Rads | 1,261 Rads | 1,681 Rads | 2,161 Rads | 2,701 Rads | 3,301 Rads |
General Strategies
 The main goal of radstarving is to avoid picking up enough rads to level up - however this can sometimes be very time consuming and sometimes can put the player at risk.
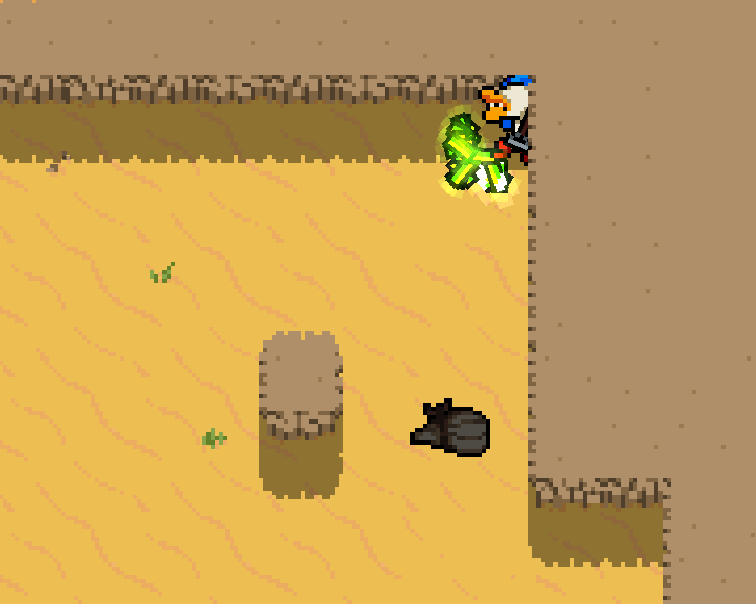
One of the most common strategies is known as 'corner starving', where hugging a corner will prevent rads from reaching the player at all as seen on the image on the right. However this can leave the player vulnuerable being forced to stay in one spot for a while; be aware that melee usage pulls the player forward into the rads.
Corner starving is a strategy for 30 FPS and does not generally work on 60 FPS, the best way to avoid rads there is to just completely hide around walls/corners even if more time consuming. If on the 2023 beta/v100, rad mechanics should be swapped to classic for the duration of starving, then swapped back to the preferred mode once starving is done.
Health/ammo may be in more limited supply as the player will be going much slower to avoid rads. Luckily, the timer for rads disappearing is smaller than pickups - enough that if an enemy drops rads and pickup, the moment the rads disappear the player can rush to the pickup and retrieve it on time.
In general most characters make starving a bit easier due to their active/passives being utilized correctly, with most falling around the middle. The best is easily Horror who is leagues better for starving than any other character. Their active ability to shoot rads makes it so the run continues at normal pace, can use rads to fill vaults quickly on bad generations, and gets extra mutation choices. For daily challenges this also makes having to do low level destiny a lot more viable as an option, as well as high level loopstarving viable as well.
Plutonium Hunger will always make starves far more time consuming as rads will be attracted from far further away, and may make particularly low level starving unviable. Another threat to starves are portals - they'll open directly over the corpse of the last enemy killed, and depending on location may cause for unwanted rads to be collected.
Vault statues start with 120 HP and will open around 80 HP. It can be damaged by the player, explosions or IDPD, but not normal enemy attacks.
The statues will then start collecting in rads - upon reaching 24 rads it will be activated, and can be broken to enter the vault. If clearing a level the player can optionally rush opening the vault statue and it will collect all the rads in place of the player, which helps reduce starving time. Be aware that if rad statues are approached slowly there may end up not being enough enemies/rads to fill the vault, however unlikely.
As a reminder the crown pedestal must be stepped on first to swap crowns - if vault statues are broken up before this, crown selection will be skipped. Also be aware of a bug where if leveling up in a vault (from crown guardians or if a hostile horror spawns) and Crown of Destiny is swapped off, it will erase the following set. This is present on both Non-Beta and Betas and unlikely to be patched.
The 3-2 Strat
The most common strategy for radstarving on dailies is by taking Crown of Destiny in the 3-2 vault, and then taking it off on the 5-2 vault. Typical starves start at level 5, this is usually the most optimal as it can be reached semi-consistently by 3-2 and gives the most leeway for starving, with it taking 300 rads to reach level 6 as leeway. Some seeds only have level 4 as a possibility, while other seeds the player can actually reach level 6 by then.
However some dailies may call for lower level starving. One way to speed this up is to summon Big Bandit on 1-1 using the Oasis strategy (opening the chests/rad can without killing enemies), but do not kill Big Bandit within 10 seconds. If he is not killed quickly enough then Oasis will not be triggered, but the area will still be set to 1-3 and the next level will be 2-1 instead. This skips two full levels and keeps difficulty lower, which reduces the enemy count (but also delaying how soon better weapons can drop).
The best weapons to run for these areas are ones that have low ammo consumption while dealing decent damage.
- Most melee are a safe crutch for starving as it can hit enemies through walls and can help defend in an unsafe spawn, but inevitably will slow down a run in this scenario.
- Most bolts are great options as they do good damage, high range with lower ammo consumption. Even the default Crossbow can carry a starve as it one shots mid-HP range enemies such as Spiders, Snowbots and Wolves.
- Explosive weapons are situationally helpful as they can dig into walls giving the player extra safe spots to starve from.
- As a sort of 'last case scenario' it can also be used to dig around to vaults if drastically close to leveling up, but is incredibly time consuming.
This section will brief over the enemies and how much of a threat they pose while trying to radstarve. Pay particular attention to their rad drops and base pickup chance.
| Scrapyards | ||||||
Bandit |
Assassin |
Raven |
Salamander
| Sniper |
Big Dog |
Big Dog Missile (ScrapBoss Missile)  |
| 3 Projectile Damage | 5 Melee Damage | 3 Projectile Damage | 1 Contact Damage 2-6 dmg/flame |
3 Projectile Damage 5-10 Explosive Damage (Death) |
3 Projectile Damage 5-10 Explosive Damage (Death) |
5 Contact Damage 5-10 Explosive Damage (Death) |
| 4 HP | 7 HP | 10 HP | 25 HP | 6 HP | 300 HP | 22 HP |
| 2 Rads 1 Pickup (16%) |
8 Rads (16 Rads while idle) 1 Pickup (20%) |
4 Rads 1 Pickup (20%) |
12 Rads 1 Pickup (30%) |
8 Rads 1 Pickup (40%) |
90 Rads 1 Weapon Drop (100%) |
1 Pickup (100%) |
If having to radstarve on 3-1 or 3-2 these are particularly easy levels as they usually have very hallway-like layouts that makes avoiding rads easy. Although if on 3-2, if too many enemies advance on the player before the vault is open, then there may not be enough enemies sometimes requiring rushing.
3-3 is always a very open area, and depending on generation hiding on spawn may not be safe enough for the player if there are well lined Snipers, sometimes requiring more aggressive play to clear out Ravens and Assassins to make the spawn area more safe. There are options for slower play in Caves and Frocity if rad levels are too high, so judgement calls can be made to minimize risks to the run.
Big Dog has the highest rad yield of any enemy during this starving method and avoiding his rads makes the rest of starving go much more smoothly. Especially with plutonium hunger, the moment he dies it is fairly easily to pick up unwanted rads, so extra distance should be kept upon hearing his low health noise indicator. The moment he dies the player should be hugging a corner or wall - however it is very difficult to predict where the portal may open based on Big Dog's corpse and can lead to the portal collecting all the rads regardless. If worried about rad levels, a Bandit or Sniper could be kept alive off-screen while Big Dog is handled to avoid unpredictable portal placement.
| Crystal Caves | ||
| Bandit |
Spider |
Laser Crystal |
| 3 Projectile Damage | 3 Contact Damage | 20 Contact Damage 1-2 dmg/laser |
| 4 HP | 18 HP | 45 HP |
| 2 Rads 1 Pickup (16%) |
9 Rads 1 Pickup (30%) 1 Weapon Drop (2%) |
22 Rads 1 Pickup (35%) 1 Weapon Drop (5%) |
Crystal Caves is not directly challenging provided the right weapons, however radstarving is particularly time-consuming here due to the level being darker. Enemies are often killed at close-range adding to wait time.
Be particularly cautious of corner starving here as Laser Crystals out of view can easily melt HP. Hiding around walls and only picking off one or two enemies at a time is particularly time consuming, it also is much safer.
(One particular strategy for the impatient while very situational - if high on ammo the player can fire into the darkness towards areas they think enemies may be. If a different weapon type gets pulled in from 3-3 that ammo can quickly be exhausted as well.)
| Frozen City | ||||
Snow Bandit |
Snowbot |
Wolf |
Snowtank |
Gold Snowtank |
| 3 Projectile Damage | 4 Charge Damage | 2 Contact Damage 3 Projectile Damage |
3 Projectile Damage 5-10 Explosive Damage (Death) |
3 Projectile Damage 4 Contact Damage (Missile) 5-10 Explosive Damage (Missile & Death) |
| 8 HP | 15 HP | 12 HP | 50 HP | 70 HP |
| 4 Rads 1 Pickup (16%) |
4 Rads 1 Pickup (40%) 1 Weapon Drop (8%) |
5 Rads | 8 Rads 2 Pickups (50%) |
13 Rads 2 Pickups (50%) |
The last leg of radstarving is 5-1 and 5-2. Neither of these levels should be particularly difficult, though there are some things to be aware of.
Snowtanks and Wolves are particularly aggressive enemies that makes collecting pickups while avoiding rads difficult. If the player is in a particular tight spot they can 'bait' Snowbots towards spawn by standing just in range until they start charging, then fleeing to the nearest corner to single them out. Wolves can always be killed at a distance without worry as they only drop rads - no pickups.
On the other hand, Snowtanks are enemies that can be partially ignored unless if in an open field. They very obviously telegraph their attacks and are easy to side-step, so they can be 'reserved' to kill for last while more aggressive enemies are dealt with first, essentially being saved for free pickups.
Golden Tanks can't spawn until 5-2, and usually are high priority targets on the other hand.
Snow Bandits do not naturally spawn, but four are guaranteed to spawn alongside the 5-2 Vault. If one is seen that will point the player in the direction of the Vault which can speed up time.
| Crown Vault |
Crown Guardian |
| 12 Projectile Damage (Large Orb) 5 Projectile Damage (Normal Orb) |
| 70 HP |
| 12 Rads 1 Pickup (100%) |
Once inside the Crown Vault the only threat left is two Crown Guardians. They can quickly be dealt with if radstarving has been done properly as they drop 24 rads combined (1 less than a Rad Canister). Any other crown or bare head can be selected from there and the run can continue as normal.
If particularly low on ammo, Crown Guardian orbs can always be farmed with melee to not throw against the Lil Hunter fight.
If particularly high on rads with the risk of leveling up, one Crown Guardian can be killed while the player safely retreats near spawn, only killing the other Crown Guardian when it teleports nearby and there is a nearby corner to hug.
Loopstarving
For reasons mentioned above loopstarving is strongly recommended against, unless if playing as Horror. Where the 3-2 strat only requires starving through four levels, the 5-2 strat requires starving through 7 levels (not including 0-1) with many more issues and threats towards rad collection. This section will not be in-depth, but will point out the major threats of each area.
The pickups, HP and damage are all on the enemies page (currently WIP) to watch out for in each area.
1. Rest of Frozen City immediately starts out with Lil Hunter fight who should be dealt with swiftly. When he is low on HP distance should be kept to avoid collecting his rads, and to have an escape plan of his death explosion ends up too near the player.
2. Labs will inevitably be annoying as enemies will repeatedly spawn thanks to Necromancers who are always top priority to kill. Repeatedly killing Freaks near spawn can cause ammo to drain (unless if running ammoless melee, in which case it's just time-consuming), while pushing through the level can cause for a lot of unnecessary rads to be collected. As Necromancers can only respawn corpses in their line of sight, the player can try to 'bait' some Freaks down a hallway away from where they were revived, and then killed while standing in a corner.
3. Palace is particularly annoying as enemies all have high rad yields and are particularly aggressive. Dogs are particularly the most annoying pushing into spawn, which can be helped with any melee as they ignore iframes during Dog charges.
4. The Throne will drop a whopping 200 rads and a collective 80 from generators which is a high risk for leveling. The loop portal will pull the player from across the map making normal corner starving not viable - instead the player should stay around the hight of the first set of generators during the fight, destroying the second set from above. This will keep The Throne at a relatively high position, and the player can hide behind the walls of either lower broken generator to avoid rad collection once the fight is over.
5. Throne 2 drops 100 rads that are almost impossible to avoid. The fight should just be done as normal.
6. The Desert will be the last and most annoying test for radstarving. Flies will always have to be dealt with first as they are very aggressive enemies and constantly spew Maggots that also drop rads. Swapping weapons to exhaust ammo types may be particularly useful here given the volume of enemies - the most reliable way to gain ammo back will be through the IDPD spawns, especially while having to radstarve.