This page is a WIP! Formatting may change wildly and information may not be completely accurate. |
Bosses Overview
Page Contents
Enemies will be slightly more difficult with every passing loop due to increased numbers and HP scaling. However this pales in comparison to bosses who become absurdly difficult later on as their HP scaling is at a much higher rate than enemies, and will uniquely also have specific attacks scale.
This is a more advanced guide. If trying to learn meta (like L3-L5) this page is less important, just be familiar with how boss attacks scale. The closer to L10+ the player is, the more important this guide will become.
Bosses will be listed in order, however they can roughly be ranked by
difficulty in the following list. These bosses aren't instantly
difficult but rather become progressively more dangerous due to
their attack and HP scaling.
- High Difficulty: Big Bandits, Mom, Throne II
- Medium Difficulty: Hyper Crystal, The Throne
- Medium-Low Difficulty: Lil Hunter
- Low Difficulty: Big Dog
- No Difficulty: Technomancer
Cursed Hyper Crystal can be considered slightly more difficult than Hyper Crystal, especially if the area is fully webbed. Captain and Gun God bosses are not relevant to meta runs and not listed.
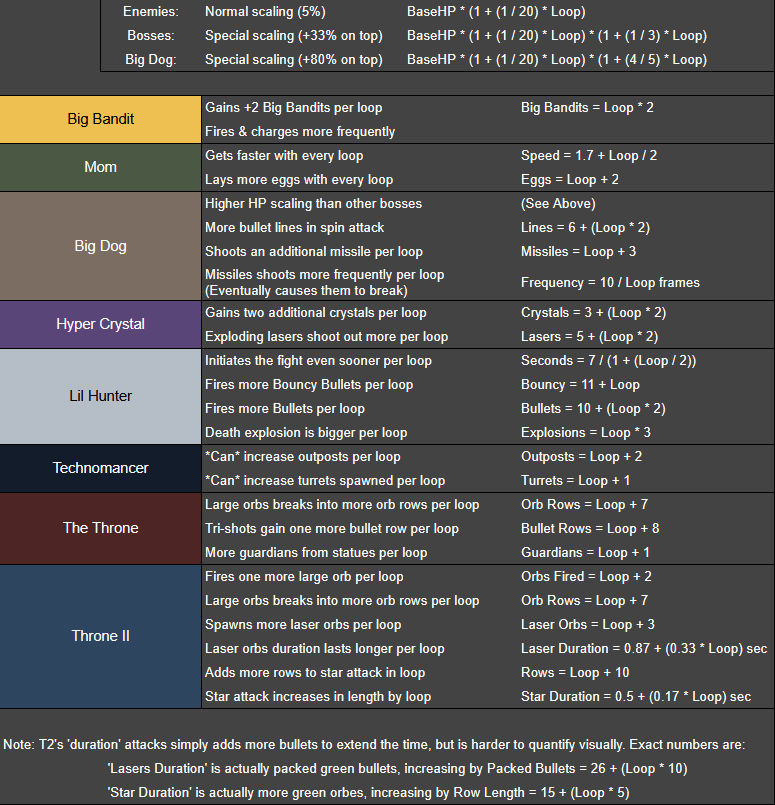
HP scaling works as follows:
- For Enemies: BaseHP * (1 + (1 / 20) * Loop)
- For Bosses: BaseHP * (1 + (1 / 20) * Loop) * (1 + (1 / 3) * Loop)
- For Big Dog: BaseHP * (1 + (1 / 20) * Loop) * (1 + (4 / 5) * Loop)
In other words enemies will gain 5% of their base HP for every loop, while bosses gain the 5% multiplied with 33% of their base HP, or 80% for Big Dog. These are always rounded to the nearest whole number; Scarier Face will only go into effect after the calculation has taken place.
This is a summary of every tech section for bosses:
Big Bandit strategy
Special scaling:.
-
Every loop will add two more Big Bandits that spawn starting with two
on L1.
- Big Bandits = Loop * 2
- They will attack much more aggressively, firing at the player far more frequently. They may also restart their firing mid-attack in order to better aim at the player.
- Will also charge pretty much instantaneously if they are able to.
| Loop: | L0 | L1 | L2 | L3 | L4 | L5 | L6 | L7 | L8 | L9 | L10 | L11 | L12 | L13 | L14 | L15 |
| HP Per: | 100 | 140 | 183 | 230 | 280 | 333 | 390 | 450 | 513 | 580 | 650 | 723 | 800 | 963 | 880 | 1050 |
| Face: | 80 | 112 | 147 | 184 | 224 | 267 | 312 | 360 | 411 | 464 | 520 | 579 | 640 | 704 | 771 | 840 |
| Loop: | L16 | L17 | L18 | L19 | L20 | L21 | L22 | L23 | L24 | L25 | L26 | L27 | L28 | L29 | L30 | L31 |
| HP Per: | 1140 | 1233 | 1330 | 1430 | 1533 | 1640 | 1750 | 1863 | 1980 | 2100 | 2223 | 2350 | 2480 | 2613 | 2750 | 2890 |
| Face | 912 | 987 | 1064 | 1144 | 1227 | 1312 | 1400 | 1491 | 1584 | 1680 | 1779 | 1880 | 1984 | 2091 | 2200 | 2312 |
Strategy Guide Coming Soon!
Mom strategy
Special scaling:
-
Every loop Mom will increase in speed, eventually becoming the fastest
thing in the game.
- Speed = 1.7 + (Loop / 2)
-
Her egg attack cycle will include one more laid per loop as well.
- Eggs = Loop + 2
| Loop: | L0 | L1 | L2 | L3 | L4 | L5 | L6 | L7 | L8 | L9 | L10 | L11 | L12 | L13 | L14 | L15 |
| HP: | 350 | 490 | 642 | 805 | 980 | 1167 | 1365 | 1575 | 1797 | 2030 | 2275 | 2532 | 2800 | 3080 | 3372 | 3675 |
| Face: | 280 | 392 | 513 | 644 | 784 | 933 | 1092 | 1260 | 1437 | 1624 | 1820 | 2025 | 2240 | 2464 | 2697 | 2940 |
| Loop: | L16 | L17 | L18 | L19 | L20 | L21 | L22 | L23 | L24 | L25 | L26 | L27 | L28 | L29 | L30 | L31 |
| HP: | 3990 | 4317 | 4655 | 5005 | 5367 | 5740 | 6125 | 6522 | 6930 | 7350 | 7782 | 8225 | 8680 | 9147 | 9625 | 10115 |
| Face: | 3192 | 3453 | 3724 | 4004 | 4293 | 4592 | 4900 | 5217 | 5544 | 5880 | 6225 | 6580 | 6944 | 7317 | 7700 | 8092 |
Strategy Guide Coming Soon!
Big Dog strategy
Special scaling:
- Big Dog's HP will scale an extra 80% per loop on top of the normal enemy multiplier, where it's only 33% for other bosses. (Equation in intro section)
-
His bullet spin attack will include two more lines per loop.
- Lines = 6 + (Loop * 2)
-
His missile attack will include one more missile with each loop.
- Missiles = Loop + 3
-
Missiles will shoot out bullets in loop and increase rate of fire with
each loop.
- Frequency = 10 / Loop for frames
- Update 99 Bug: Missiles start shooting so fast that at one point they will only shoot out one bullet and then fail to fire anymore. This is fixed on update 100.
| Loop: | L0 | L1 | L2 | L3 | L4 | L5 | L6 | L7 | L8 | L9 | L10 | L11 | L12 | L13 | L14 | L15 |
| HP: | 300 | 567 | 858 | 1173 | 1512 | 1875 | 2262 | 2673 | 3108 | 3567 | 4050 | 4557 | 5088 | 5643 | 6222 | 6825 |
| Face: | 240 | 454 | 686 | 938 | 1210 | 1500 | 1810 | 2138 | 2486 | 2854 | 3240 | 3646 | 4070 | 4514 | 4978 | 5460 |
| Loop: | L16 | L17 | L18 | L19 | L20 | L21 | L22 | L23 | L24 | L25 | L26 | L27 | L28 | L29 | L30 | L31 |
| HP: | 7452 | 8103 | 8778 | 9477 | 10200 | 10947 | 11718 | 12513 | 13332 | 14175 | 15042 | 15933 | 16848 | 17787 | 18750 | 19737 |
| Face: | 5962 | 6482 | 7022 | 7582 | 8160 | 8758 | 9374 | 10010 | 10666 | 11340 | 12034 | 12746 | 13478 | 14230 | 15000 | 15790 |
Strategy Guide Coming Soon!
Hyper Crystal strategy
Special scaling:
-
Hyper Crystal will gain another two Laser Crystals spawned in its
circle per loop.
- Crystals = 3 + (Loop * 2)
-
If the Hyper Crystal explodes a Laser Crystal during its seeking
phase, it will explode into additional lasers scaled by loop.
- Lasers = 5 + (Loop * 2)
| Loop: | L0 | L1 | L2 | L3 | L4 | L5 | L6 | L7 | L8 | L9 | L10 | L11 | L12 | L13 | L14 | L15 |
| HP: | 550 | 770 | 1008 | 1265 | 1540 | 1833 | 2145 | 2475 | 2823 | 3190 | 3575 | 3978 | 4400 | 4840 | 5298 | 5775 |
| Face: | 440 | 616 | 807 | 1012 | 1232 | 1467 | 1980 | 2259 | 2552 | 2860 | 3183 | 3520 | 3872 | 4239 | 4620 | 5016 |
| Loop: | L16 | L17 | L18 | L19 | L20 | L21 | L22 | L23 | L24 | L25 | L26 | L27 | L28 | L29 | L30 | L31 |
| HP: | 6270 | 6783 | 7315 | 7865 | 8433 | 9020 | 9625 | 10248 | 10890 | 11550 | 12228 | 12925 | 13640 | 14373 | 15125 | 15895 |
| Face: | 5016 | 5427 | 5852 | 6292 | 6747 | 7216 | 7700 | 8199 | 8712 | 9240 | 9783 | 10340 | 10912 | 11499 | 12100 | 12716 |
Strategy:
Cursed Hyper Crystal strategy
Cursed Hyper Crystal actually is the same enemy as the Hyper Crystal, it's just that it spawns different enemies based on areas. In Cursed Crystal Caves it will instead spawn Cursed Laser Crystals and rarely will include Lightning Crystals in its circle.
Strategy Guide Coming Soon!
Lil Hunter strategy
Special scaling:
-
Lil Hunter will initiate fighting the player much sooner based on time
spent in the level, scaling by loop.
- Seconds = 7 / (1 + (Loop / 2))
-
In close range he will fire his bouncy attack much more aggressively
in loop, and will fire more bullets based on loop.
- Bouncy Bullets = 11 + Loop
-
His long range attack will also gain more projectiles, increasing it
in length.
- Bullets = 10 + (Loop * 2)
-
His death explosion will add more explosions each loop, thus
increasing the explosion radius as they are pushed outwards.
- Explosions = Loop * 3
| Loop: | L0 | L1 | L2 | L3 | L4 | L5 | L6 | L7 | L8 | L9 | L10 | L11 | L12 | L13 | L14 | L15 |
| HP: | 140 | 196 | 257 | 322 | 392 | 467 | 546 | 630 | 719 | 812 | 910 | 1013 | 1120 | 1232 | 1349 | 1470 |
| Face: | 112 | 157 | 205 | 258 | 314 | 373 | 437 | 504 | 575 | 650 | 728 | 810 | 896 | 986 | 1079 | 1176 |
| Loop: | L16 | L17 | L18 | L19 | L20 | L21 | L22 | L23 | L24 | L25 | L26 | L27 | L28 | L29 | L30 | L31 |
| HP: | 1596 | 1727 | 1862 | 2002 | 2147 | 2296 | 2450 | 2609 | 2772 | 2940 | 3113 | 3290 | 3472 | 3659 | 3850 | 4046 |
| Face: | 1277 | 1381 | 1490 | 1602 | 1717 | 1837 | 1960 | 2087 | 2218 | 2352 | 2490 | 2632 | 2778 | 2927 | 3080 | 3237 |
Strategy Guide Coming Soon!
Technomancer strategy
Special scaling:
-
Technomancer can gain more 'outposts' based on loop that they
can switch to. This is not guaranteed based on limited level space.
- Outposts = Loop + 2
-
They can also spawn more Turrets per loop, however this may
be limited based on space around them.
- Turrets = Loop + 1
| Loop: | L0 | L1 | L2 | L3 | L4 | L5 | L6 | L7 | L8 | L9 | L10 | L11 | L12 | L13 | L14 | L15 |
| HP: | 350 | 490 | 642 | 805 | 980 | 1167 | 1365 | 1575 | 1797 | 2030 | 2275 | 2532 | 2800 | 3080 | 3372 | 3675 |
| Face: | 280 | 392 | 513 | 644 | 784 | 933 | 1092 | 1260 | 1437 | 1624 | 1820 | 2025 | 2240 | 2464 | 2697 | 2940 |
| Loop: | L16 | L17 | L18 | L19 | L20 | L21 | L22 | L23 | L24 | L25 | L26 | L27 | L28 | L29 | L30 | L31 |
| HP: | 3990 | 4317 | 4655 | 5005 | 5367 | 5740 | 6125 | 6522 | 6930 | 7350 | 7782 | 8225 | 8680 | 9147 | 9625 | 10115 |
| Face: | 3192 | 3453 | 3724 | 4004 | 4293 | 4592 | 4900 | 5217 | 5544 | 5880 | 6225 | 6580 | 6944 | 7317 | 7700 | 8092 |
Strategy Guide Coming Soon!
The Throne strategy
Special scaling:
-
The Throne's tri-shot attack will gain one more bullet per loop for
each row, making the attack last longer.
- Bullet Rows = Loop + 8
- Bullet Rows = Loop + 3 (During its low HP phase)
-
The large orb attack will break into more rows of orbs when broken.
- Orb Rows = Loop + 7
-
Guardian Statues will spawn an additional guardian each loop upon
breaking.
- Guardians = Loop + 1
| Loop: | L0 | L1 | L2 | L3 | L4 | L5 | L6 | L7 | L8 | L9 | L10 | L11 | L12 | L13 | L14 | L15 |
| HP: | 1500 | 2100 | 2750 | 3450 | 4200 | 5000 | 5850 | 6750 | 7700 | 8700 | 9750 | 10850 | 12000 | 13200 | 14450 | 15750 |
| Face: | 1200 | 1680 | 2200 | 2760 | 3360 | 4000 | 4680 | 5400 | 6160 | 6960 | 7800 | 8680 | 9600 | 10560 | 11560 | 12600 |
| Loop: | L16 | L17 | L18 | L19 | L20 | L21 | L22 | L23 | L24 | L25 | L26 | L27 | L28 | L29 | L30 | L31 |
| HP: | 17100 | 18500 | 19950 | 21450 | 23000 | 24600 | 26250 | 27950 | 29700 | 31500 | 33350 | 35250 | 37200 | 39200 | 41250 | 43350 |
| Face: | 13680 | 14800 | 15960 | 17160 | 18400 | 19680 | 21000 | 22360 | 23760 | 25200 | 26680 | 28200 | 29760 | 31360 | 33000 | 34680 |
Strategy Guide Coming Soon!
Throne II strategy
Special scaling:
-
Throne II will shoot out more large orbs (unlike normal Throne)
scaling by loop, in addition to breaking into additional rows of orbs.
- Orbs Fired = Loop + 2
- Orb Rows = Loop + 7
-
It will also shoot out more laser orbs per loop, each shooting out
more packed green bullets making them last longer in duration.
- Laser Orbs = Loop + 3
- Laser Duration (seconds) = 0.87 + (0.33 * Loop)
-
The star attack will include one more row of orbs per loop, as well
having more orbs packed onto the end making it last longer in
duration.
- Orb Rows = Loop + 10
- Star Duration (seconds) = 0.5 + (0.17 * Loop)
-
'Duration' for the laser and star attack is due to extra projectiles
at the end, which is better explained by seconds. However, here are
the exact formulas, while not as useful:
- Laser's Packed Bullets = 26 + (Loop * 10)
- Star Attack Orbs = 15 + (Loop * 5)
| Loop: | L0 | L1 | L2 | L3 | L4 | L5 | L6 | L7 | L8 | L9 | L10 | L11 | L12 | L13 | L14 | L15 |
| HP: | 600 | 840 | 1100 | 1380 | 1680 | 2000 | 2340 | 2700 | 3080 | 3480 | 3900 | 4340 | 4800 | 5280 | 5780 | 6300 |
| Face: | 480 | 672 | 880 | 1104 | 1344 | 1600 | 1872 | 2160 | 2464 | 2784 | 3120 | 3472 | 3840 | 4224 | 4624 | 5040 |
| Loop: | L16 | L17 | L18 | L19 | L20 | L21 | L22 | L23 | L24 | L25 | L26 | L27 | L28 | L29 | L30 | L31 |
| HP: | 6840 | 7400 | 7980 | 8580 | 9200 | 9840 | 10500 | 11180 | 11880 | 12600 | 13340 | 14100 | 14880 | 15680 | 16500 | 17340 |
| Face: | 5472 | 5920 | 6384 | 6864 | 7360 | 7872 | 8400 | 8944 | 9504 | 10080 | 10672 | 11280 | 11904 | 12544 | 13200 | 13872 |
Strategy Guide Coming Soon!