Difficulty Explained
Difficulty is a hidden number that is used by the game to determine when weapons are added to the drop pool, and how many enemies will spawn during level generation before cluster spawns are accounted for. The higher the difficulty the more enemies that can spawn, but also the possibility of higher-tier weapons appearing.
Difficulty starts at 1 on 1-1 and is incremented by 1 every time the
player enters a portal. 1-2 would have 2 difficulty, and 1-3 would have
3 difficulty, and so on.
With no secret areas this would give 15 difficulty at the end of
preloop, and then +16 difficulty for every consecutive loop completed.
As difficulty is increased based on portals entered that means that
secret areas can situationally increase/decrease difficulty relative to
a normal run.
If any levels are skipped (primarily with Oasis) this will result in
less difficulty meaning that areas will have more sparse enemies, but
also delay how soon better weapons can drop.
Any additional levels (Pizza Sewers and Crown Vaults) will cause for
additional difficulty which can add more enemies to a level, while also
adding better weapons to the drop pool sooner.
Replacement areas (Y.V.'s Mansion, Cursed Crystal Caves and Jungle) will
keep difficulty the same relative to a normal run.
A normal run has 15 difficulty by the end of preloop, so if a run visits
Pizza Sewers (+1) and both Crown Vaults (+2) it would have 18 difficulty
instead.
A full Oasis skip would miss 1-2 to 3-2 which skips 5 areas, while Oasis
gives +1 back, so it would be -4 difficulty resulting in 11 difficulty
by the end of preloop.
There are two niche cases that affect difficulty, the first being IDPD HQ which can be entered and then exited for extra difficulty. This dropdown will explain it in full but is not necessary to read for the majority of players.
IDPD HQ
As a note HQ is only mostly understood, so there may be some discrepancies as behavior will change based on version.
If IDPD HQ is entered it will take the player to HQ1. A Van can be taken to then exit again, or the level can be completed to visit HQ2. If the Van is not taken in HQ2 to leave, then the run will end on HQ3 with either victory or death. HQ can only be visited once a run and only during Loops 1 or 2. Visiting HQ for extra kills/difficulty is known in the community as "HQ Abuse".
Update 100: Exiting HQ will simply bring the player to the next area, such as 1-3 -> HQ -> 2-1.
This will always result in +1 difficulty for HQ1, or +2 difficulty for HQ2.
The only exception is if a Vault portal is open on an X-2 level when HQ is entered, as exiting HQ will cause the X-2 level to repeat.
This can be difficult to execute as Vaults being opened prevents Vans from spawning, meaning it is a tight window to break the Vault
after a Van spawns.
For HQ1 this would give +2 difficulty, while HQ2 would give +3 difficulty, without counting the Vault visit.
Update 99: HQ will behave differently based on levels entered.
- Entering from any transitional area (2-1, 4-1 and 6-1) will simply bring the player to the next area.
- Entering from the first level of any larger area (1-1, 3-1, 5-1 and 7-1) will cause the X-2 area to be skipped, bringing
the player straight to X-3 after exiting HQ.
- Entering from the third level of any larger area (1-3, 3-3, 5-3) will cause the level to be repeated. On this version,
score chasers would most frequently HQ abuse from 1-3 in Loop 1 or 2 for the best maximum score.
The other niche case is Y.V.'s Crib which will be expanded upon another day, as it will take time to fully document.
Y.V.'s Crib
Coming soon to a Wasteland near you!
The other factor for difficulty is if playing Hardmode. This will increase difficulty by 2 instead of 1 for enemies, yet weapons will be added to the drop pool at a much slower rate. It is fully explained on the hardmode guide (work in progress).
Weapon Drops
Here is a list of weapons for illustration, from the weapon table page.
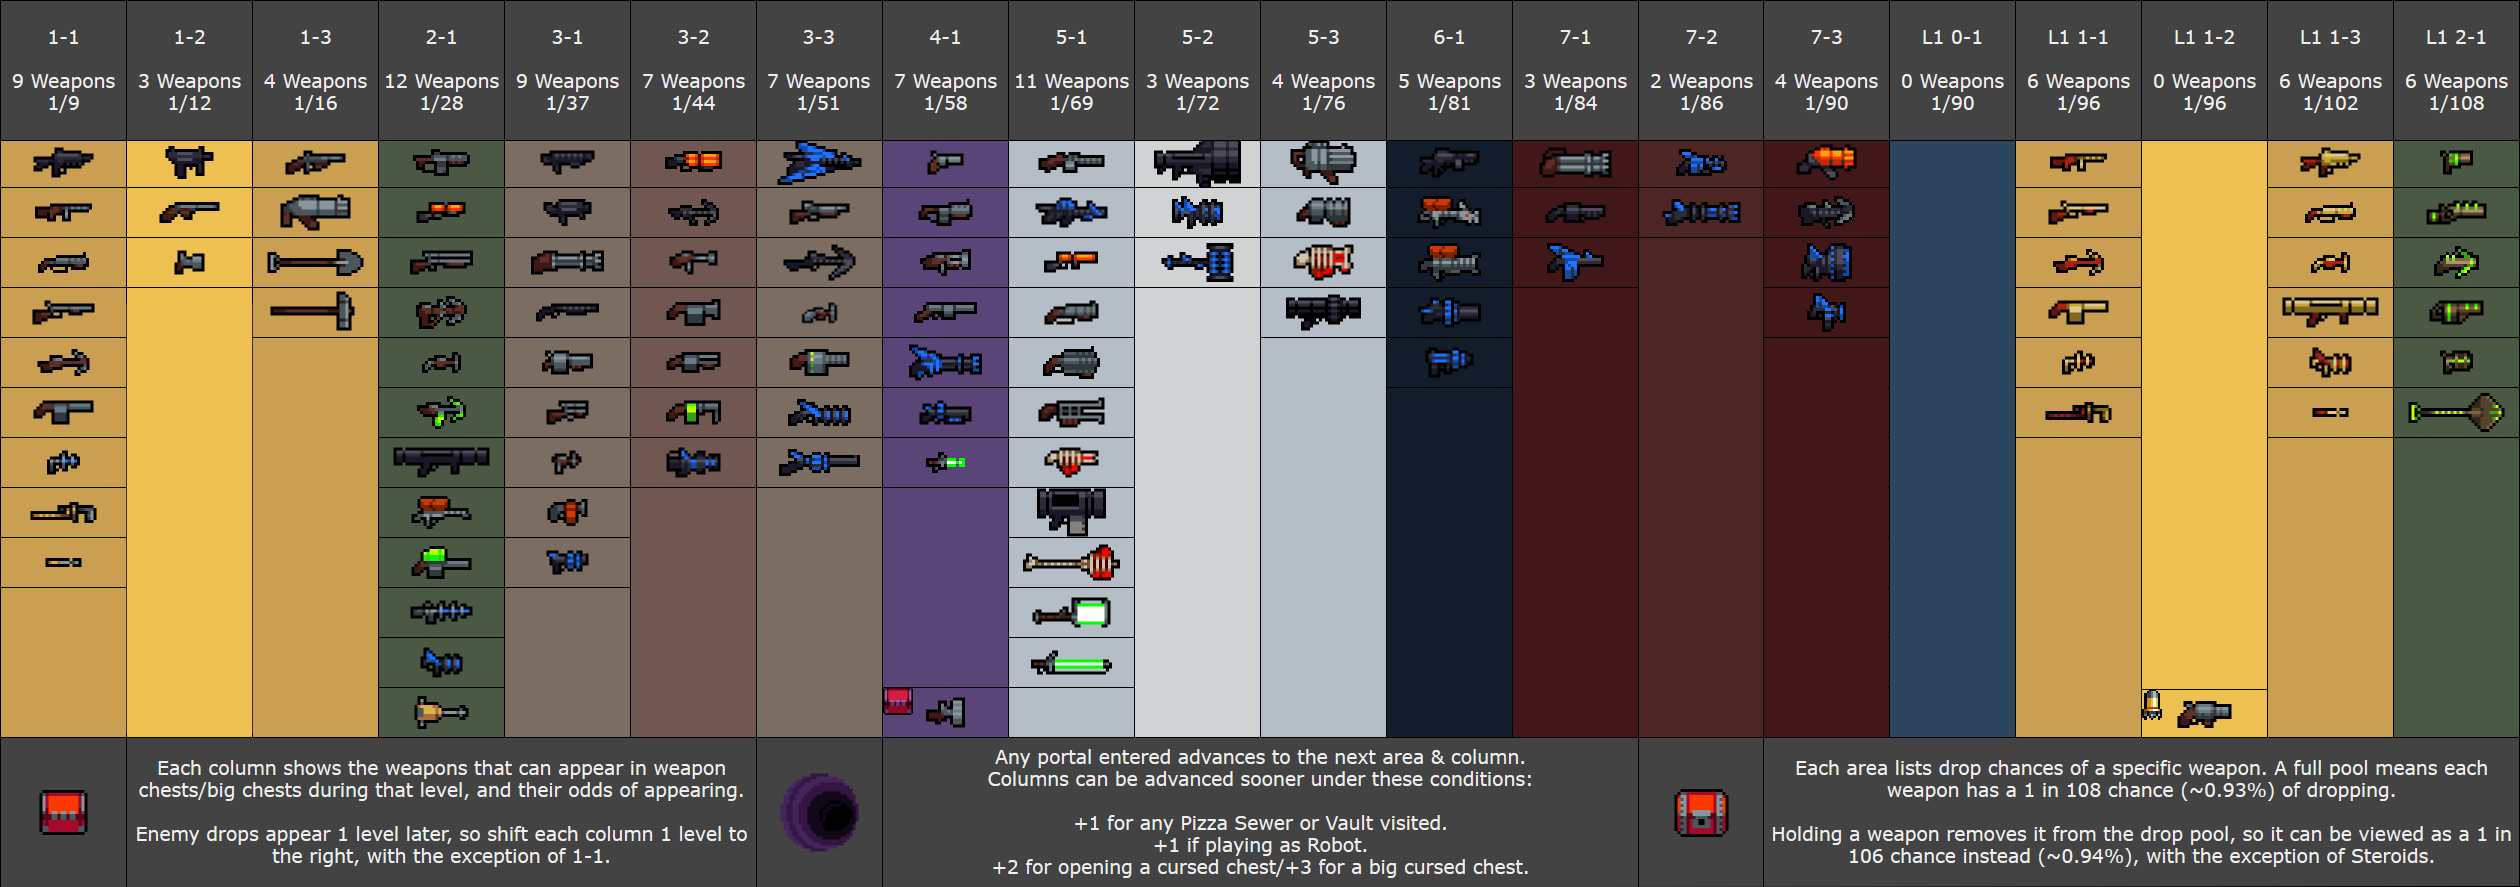
Weapon drop logic relies on difficulty to determine what weapons are allowed to drop at any point. As difficulty naturally increases more weapons are available to drop, creating a steady power progression in the run.
Internally every weapon has a set tier, a number used for comparison against difficulty. If a weapon's tier is higher than the current difficulty it cannot drop, but if it is equal or lower to the current difficulty then it can.
All weapons have an equal chance of dropping as long as they are in the drop pool. Weapons that are currently being held are removed from the drop pool which gives slightly better odds to see other weapons. (Weapons are not removed from the drop pool for Steroids due to his dual wielding.)
There are multiple sources in which weapons can drop and some of them affect difficulty differently. These sources include:
| IDNTG listing: | In actuality: |
|
|
Other things to note is that both cursed chest types will never include weapons that appear in 1-1 chests, which includes 8 weapons. Robot's passive gives them a +1 bonus to see weapon drops sooner, while their Refined Taste ultra will remove any weapon up to the normal 2-1 drop pool (the first 28 weapons).
Enemy Quantity
The difficulty number is also used by the level generator as the odds of an enemy spawning on each floor tile, and also determining the minimum number of enemies that must spawn.
Level generation will start by building the layout of the level and then populate it. Every floor tile will run the odds on whether it should spawn enemies or not. Floor tiles around the player's spawn will be skipped, and tiles containing weapon chests/rad cans will be skipped.
There are three stages of enemy population:
- The first stage rolls the odds of Difficulty / (Difficulty + 10) to determine if an enemy should spawn on the current floor.
-
The second stage will run a check if currently spawned enemies on a
floor is lower than 3 + (Difficulty / 1.5), and will guarantee to
spawn enemies if this number is not met.
- This is limited by the amount of tiles that are on the level, meaning that the second spawning stage will be capped out eventually and will be equal to the number of valid tiles.
- The third stage takes place only if running Crown of Blood. It will roll the odds of Difficulty / (Difficulty + 8) to spawn additional enemies on the current floor.
Cluster Spawns are not based on difficulty but rather simply loops, not occurring on preloop. After the level has been fully populated it will run the calculation on every enemy with the odds of Loop / 60. If successful it will add the same enemy types based on the calculation of Loop + 3.
Enemies that spawn midway into a level cannot include cluster spawns. Mimic variants and Maggot Nests are also excluded from spawning in clusters but could have in previous versions, while Hostile Horror can still spawn in a cluster.
Cluster Spawning Chart |
||||||||||
|---|---|---|---|---|---|---|---|---|---|---|
| Loop: | 1 | 2 | 3 | 4 | 5 | 6 | 7 | 8 | 9 | 10 |
| Odds: | 1.67% | 3.33% | 5% | 6.67% | 8.33% | 10% | 11.67% | 13.33% | 15% | 16.67% |
| Extra Enemies: | 4 | 5 | 6 | 7 | 8 | 9 | 10 | 11 | 12 | 13 |
| Loop: | 11 | 12 | 13 | 14 | 15 | 16 | 17 | 18 | 19 | 20 |
| Odds: | 18.33% | 20% | 21.67% | 23.33% | 25% | 26.67% | 28.33% | 30% | 31.67% | 33.33% |
| Extra Enemies: | 14 | 15 | 16 | 17 | 18 | 19 | 20 | 21 | 22 | 23 |
| Loop: | 21 | 22 | 23 | 24 | 25 | 26 | 27 | 28 | 29 | 30 |
| Odds: | 35% | 36.67% | 38.33% | 40% | 41.67% | 43.33% | 45% | 46.67% | 48.33% | 50% |
| Extra Enemies: | 24 | 25 | 26 | 27 | 28 | 29 | 30 | 31 | 32 | 33 |