Sprite Editing Overview
Page Contents
- Editing Sprites u100
- Locate Sprites u100
- Editing Sprites u99
- Locate Sprites u99
- NTT (Coming Soon)
This guide currently only serves vanilla NT. NTT editing will be added at a later date.
Any sprites seen in-game can be edited through the games files. This process is slightly complicated on update 99 and requires some extra steps, but was streamlined on update 100 and is very easy to understand. The process of sprite editing itself can be tedious especially for more complicated edits.
Changing versions on Steam can cause the spritesheet to get overwritten, so make sure to make a backup after new edits are complete. It's possible to add multiple versions to the Steam library following these dropdown instructions.
Transferring sprites between versions means taking the sprite edits from an old spritesheet and applying it to the new one. Newer versions change the spritesheets around which will make this especially tedious, so it's best to edit a version that you plan to play for a while.
Update 100 Sprite Editing
Sprite editing on update 100 is the most straightforward. Be aware that Steam auto-updates for new versions, so a back-up save is especially important. (Auto-updates can be toggled off.)
- Navigate to your game files. On Windows Steam this is located at 'C:\Program Files (x86)\Steam\steamapps\common\Nuclear Throne'.
- Open the folder titled 'tex'.
-
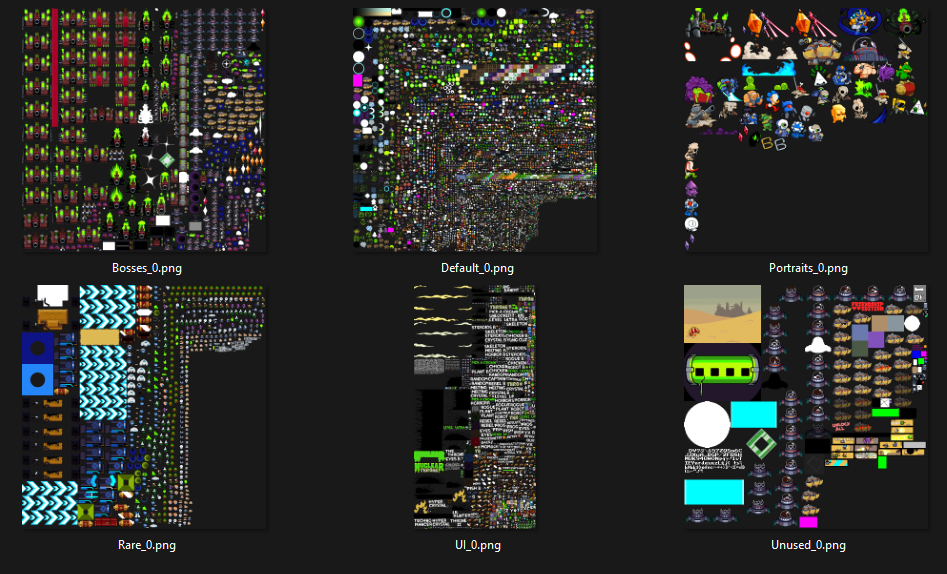
This will include 6 spritesheets in which all sprites are stored. Any
of them can be opened in an image editor tool.
- paint.net is recommended in the opinion of this guide.
- Any desired sprite edits can now be made in the image editor. Do not move sprites around or change the size of the image.
- Saving the image will overwrite the original spritesheet, which will apply these edits in-game.
- Once a new game session is launched any new changes will be present. Make sure to create a backup.
Update 100 Locating Sprites
While some of the spritesheets are somewhat organized, others are fairly cluttered and can be difficult to do larger character edits. This section will give instructions on how to locate sprites, and how to even turn them into gifs.
This guide suggests using UndertaleModTool (UMT). While this was made for Undertale/Deltarune, it can be used with most other GameMaker games to view their assets.
Once UMT is downloaded the .exe file can be opened to run the program. Through here click File -> Open and select the data.win in the Nuclear Throne folder, the same place where the texture folder
is located. ('C:\Program Files (x86)\Steam\steamapps\common\Nuclear Throne')
Alternatively the data.win file can be opened directly through the folder as UMT can detect it. If the file fails to load correctly then UMT may be outdated, download the latest version.
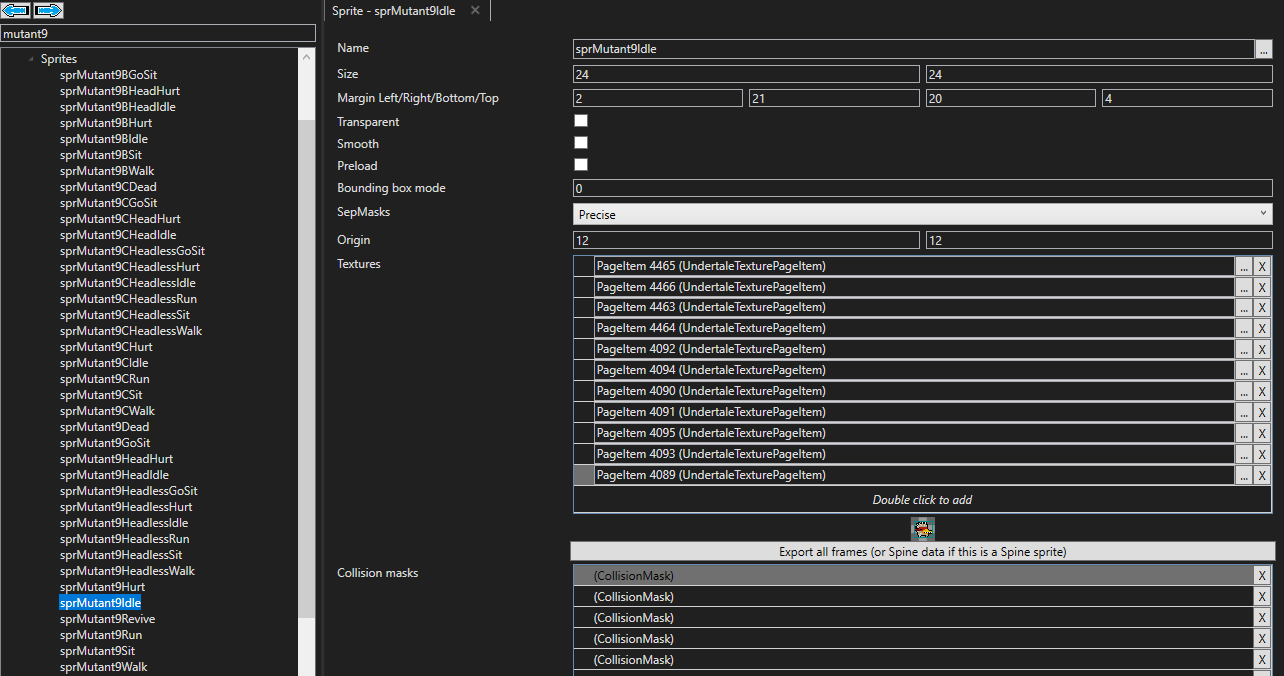
Once data.win is opened with UMT, the search bar can be used to search for any specific sprites. Here is an example image of how it would look, searching for 'Mutant9' for all the Chicken sprites:
 Dark mode for UMT can be enabled in its settings
In this example the idle sprite for Chicken's A-Skin is selected. The 'Textures' here refers to the 11 frames that are used in her idle animation. Double click any of the textures and it will pop up
specific sprite information. Source position/size will give two numbers for its coordinates, and two numbers for the sprites size.
Open paint.net back up to edit the spritesheet and there will be a coordinates display at the bottom showing where your cursor currently is,
which can be used to locate sprite locations.
UMT will also pull up a preview and highlight where the sprite is, but this can be difficult to spot with how big the spritesheets are.
Once UMT is done being used it can be exited out. No changes to the game needs to be made through UMT. When prompted to save UMT before exiting, press No.
When using the search box some sprites have different names then what they are commonly known by, such as the Mom boss being called 'FrogQueen' internally. YAL's sprite list has categories to quickly find sprites. Mutants are also numbered instead of named, as following:
Mutant Classification |
|||||||
| Mutant 1 | Fish | Mutant 2 | Crystal | Mutant 3 | Eyes | Mutant 4 | Melting |
| Mutant 5 | Plant | Mutant 6 | Y.V. | Mutant 7 | Steroids | Mutant 8 | Robot |
| Mutant 9 | Chicken | Mutant 10 | Rebel | Mutant 11 | Horror | Mutant 12 | Rogue |
| Mutant 13 | Big Dog | Mutant 14 | Skeleton | Mutant 15 | Frog | Mutant 16 | Cuz |
Making sprite gifs is incredibly easy once UMT is understood. Using UMT open the desired sprites to make into a gif and select 'Export all frames' which will create a folder with every frame numbered. Any custom sprite edits will also appear in UMT. Upon saving it will ask to include padding which is up to user preference.
A gif can be made using any online tool such as ezgif. The prompt box on the main page can be used to either open file explorer or any files can be directly dragged onto the prompt box. Make sure to include all frames at once.
Once the files are uploaded there will be options to edit how the gif is made. Change 'Delay time' from 20 to 10, and make sure the checkbox is checked to not stack frames. No other options have to be toggled. Click 'Make a GIF!' and the image will be created and the save button can be clicked.
The resize button can also be used as most sprites are pretty small. For character sprites IDNTG uses 48x48 sizing with padding, which gives more visual clarity.
Update 99 Sprite Editing
Older versions requires the usage of multiple tools in order to make sprite editing work. This is more tedious to find and edit sprites, so if possible update 100 is suggested. However the old guide will remain here for anyone on older versions:
- Open YAL's texture viewer which will be necessary for this process.
-
Select 'Menu!' on the left top and then 'Open'. This will open the
file explorer, navigate to the game files.
- On Steam this is located at 'C:\Program Files (x86)\Steam\steamapps\common\Nuclear Throne'.
-
Select the right file based on version; if the wrong one is selected
it will simply give an error.
- For u99r1: Select 'nuclearthrone.exe'.
- For 2021 Beta: Select the 'data.win' file.
- If done correctly the texture viewer will display 6 different spritesheets on the left sidebar.
- Select the desired spritesheet to edit and click the 'Save?' button at the top. The specific spritesheet will then be downloaded.
-
The spritesheet can now be opened and edited using any image editing
tool.
- paint.net is recommended in the opinion of this guide.
-
Any desired sprite edits can now be made in the image editor. Do not
move sprites around or change the size of the image.
- Spritesheets in these versions are a cluttered mess. Skip to the next section for advanced Texture Viewer usage to assist with editing, and then return to this step once complete.
- Once the desired edits are made save the image as a png.
-
Return to YAL's texture viewer. Select the 'Replace?' button on the
spritesheet you edited, and select the now modified version.
- If the image file is larger than the default it will return an error and not upload, this is a common issue.
- png crush is a good tool as it will reduce the file size while not reducing quality.
- The edits made on the texture viewer will not be immediately apparent. Swapping view to another spritesheet then swapping back will make changes visible.
- Once any spritesheets are replaced select the 'Save As...' button under the menu. This will generate a new nuclearthrone.exe or data.win file depending on version.
- Take the newly downloaded file and place it into the game files, replacing the old one.
- Once a new game session is launched any new changes will be present. Make sure to create a new backup as well.
Update 99 Locating Sprites
YAL's texture viewer has a few other tools during the sprite editing process.
Selecting 'Menu!' and then clicking 'Show sprites' will open up a list of every sprite on the sheet based on its animation grouping. The sidebar width can be adjusted to see the full names easier. Selecting a sprite from the list will automatically change to the spritesheet it is located on, though zooming out manually may have to be done to see all the sprites. Right clicking a sprite on the spritesheet will jump to its location on the list.
Ctrl+F can be used to search for groupings easier, though be aware that object names in the code may be different than what the community uses. YAL also has a sprite list that has things sorted into categories, which can be really useful.
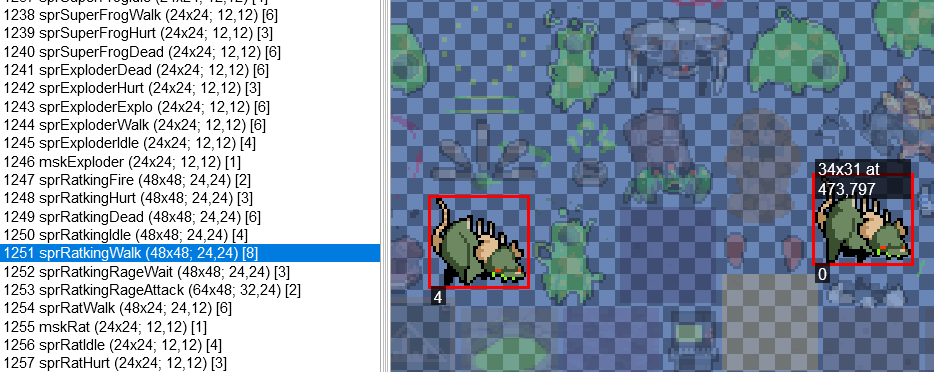
Groupings will include every frame within that specific animation. For example the image above shows 'RatkingWalk' which has 8 sprites numbered from 0-7, which covers every frame of its walk animation. In this image 0 would be the first frame, and 4 would be the fifth frame.
Mousing over a specific sprite will show its sprite size which it can be edited within, in this example being 34 x 31 pixels. The other number refers to its X and Y coordinates on the spreadsheet, being 473, 797 in this example.
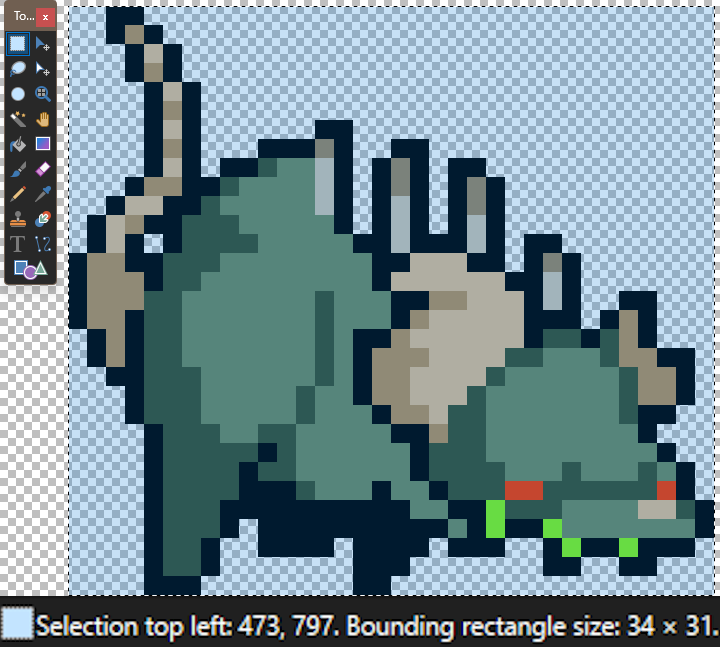
Using the paint.net program the coordinates can now be used to locate where the sprite is, which is at the right bottom of the program. The rectangle tool can be used to select the exact pixels for full accuracy, and while active it will prevent the pencil tool from drawing outside of the selected area.
Anything within the sprites boundaries can be edited. This means that sprite edits do not have to be within the specific lines of the sprite, just within the boundaries of the red box selection on the texture viewer.
Under 'Menu!' there are two other tools, the first being 'Save images' which will save every individual sprite as a ZIP. 'Save strips' will save every sprite in their specific grouping as a strip of sprites in a line in their frame order. These will take a few minutes to put together as there are over 10,000 sprites in the game.
Saving all images/strips is not necessary to the process of sprite editing for vanilla NT, although strips are useful in seeing every sprite in a grouping side by side rather than having to locate and edit them individually on a giant spritesheet. The downside to this is that once respriting is finished, every sprite will have to manually be placed in the exact right position on the spritesheet. (paint.net allows for selected images to be moved one pixel at a time using the arrow keys for exact positioning.)
NTT Spriting
Coming soon to a Wasteland near you!